Mega Tutorial: Build a Trello Clone - Part 4
26 January, 2025
This is the 4th part of the Build a Trello Clone Tutorial.
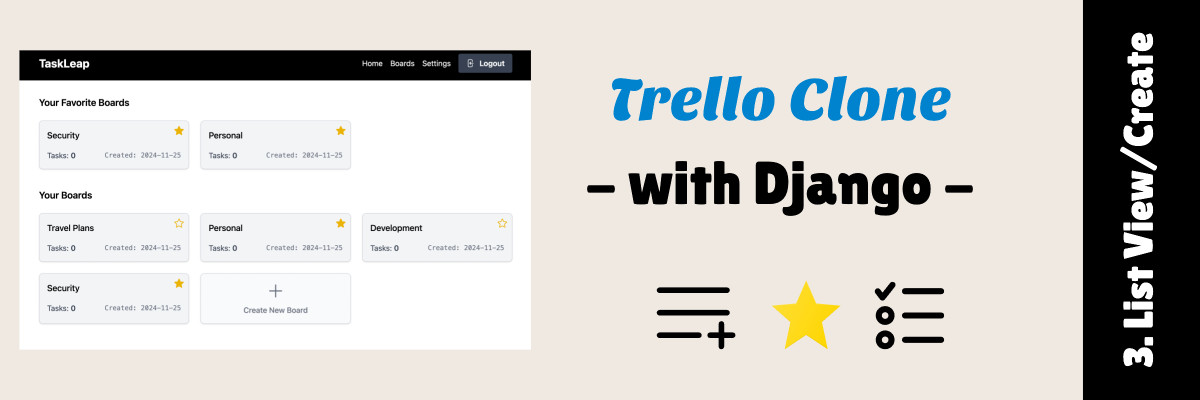
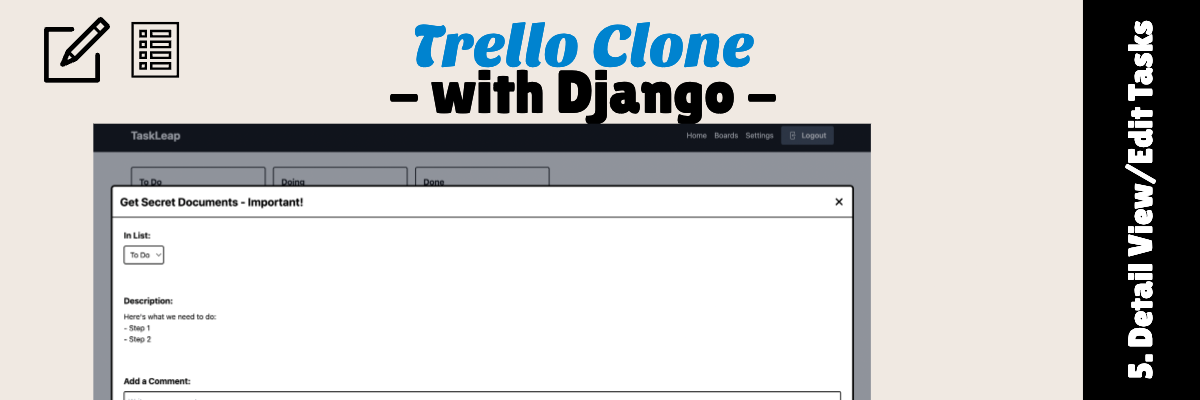
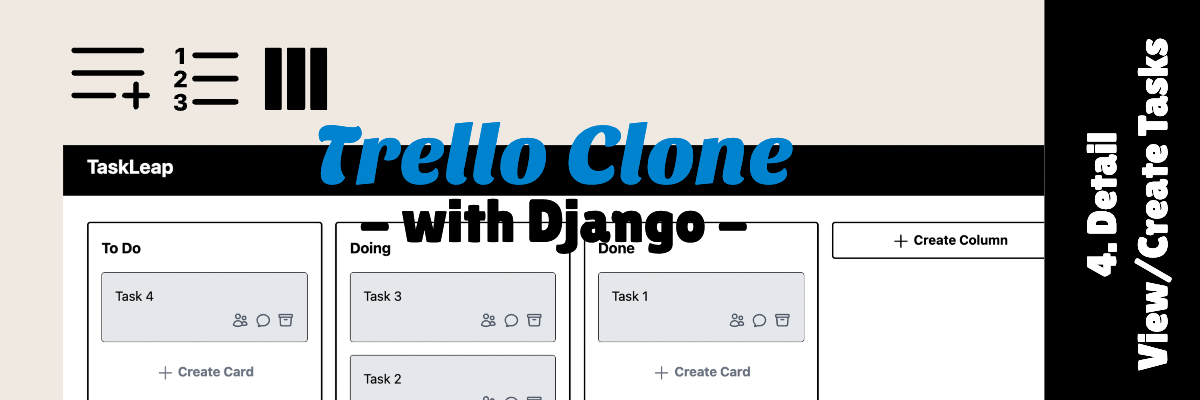
This time we will implement the Board Detail view. Here the user is able to view/create columns and cards.
We are going to use a Django DetailView and make heavy use of Django Templates.
In terms of javascript, we are creating interactivity in the app my making
forms appear/disappear when clicking certain buttons.
Let's dive it, because in this part, stuff really starts coming together nicely!
Creating the DetailView for Boards
Let's head over to the boards/views.py file and add out simple DetailView:
1 2 3 4 5 6 7 8 9 10 11 12 13 14 | from django.contrib.auth.decorators import login_required from django.shortcuts import redirect, get_object_or_404 from django.urls import reverse_lazy from django.utils.decorators import method_decorator from django.views.generic import ListView, DetailView from .models import Board, Column, Card # ... @method_decorator(login_required(login_url=reverse_lazy('login')), name='dispatch', ) class BoardDetailView(DetailView): template_name = "boards/board_detail.html" model = Board |
Let's now tie connect it to our existing application. First, boards/urls.py:
1 2 3 4 5 6 7 8 | from django.urls import path from .views import BoardListView, BoardDetailView urlpatterns = [ path('', BoardListView.as_view(), name='board_list'), path('<int:pk>/', BoardDetailView.as_view(), name='board_detail'), ] |
Create links in the BoardListView template
Now, in order to arrive here, the user should click one of the boards in the BoardListView.
Let's head over to the boards/templates/boards/partial/board_card.html
subtemplate and add the URL around the board title:
1 2 3 4 5 6 7 | ... <h3 class="text-lg font-medium mb-4"> <a href="{% url 'board_detail' pk=object.pk %}"> {{ object.title }} </a> </h3> ... |
Write templates and AlpineJS code
For today's task, most of our work will be inside the templates. Let's create the boards/templates/boards/board_detail.html:
1 2 3 4 5 6 7 8 9 10 11 12 13 14 15 16 17 18 19 | {% extends "boards/base.html" %}
{% block content %}
<div class="overflow-x-scroll">
<div class="flex min-w-max gap-4">
{% for column in object.columns.all %}
<div class="bg-white rounded shadow p-4 w-72 border-2 border-black">
<h2 class="font-bold text-lg mb-4">{{ column.title }}</h2>
<div class="space-y-4">
{% for card in column.cards.all %}
{% include "boards/partial/task_card.html" with object=card %}
{% endfor %}
</div>
{% include "boards/partial/create_card_form.html" with column=column %}
</div>
{% endfor %}
{% include "boards/partial/create_column_form.html" %}
</div>
</div>
{% endblock %}
|
Notice how we created 3 subtemplates:
-
boards/partial/task_card.html- for displaying a task card -
boards/partial/create_card_form.html- for displaying the card creation form -
boards/partial/create_column_form.html- for displaying the column creation form
We want our forms to have the same behavior as Trello: display a placeholder, when clicked, replace it with an input.
Task Card Template
This is our simple task card template (boards/partial/task_card.html).
I added some placeholder icons, we will figure them out later.
1 2 3 4 5 6 7 8 9 10 11 12 13 14 | <div class="bg-gray-200 rounded p-4 border border-black flex flex-col justify-between"> <div>{{ object.title }}</div> <div class="flex justify-end space-x-2 mt-2"> <svg class="h-5 w-5 text-gray-600" fill="none" viewBox="0 0 24 24" stroke="currentColor" stroke-width="2" > <path stroke-linecap="round" stroke-linejoin="round" d="M15 19.128a9.38 9.38 0 0 0 2.625.372 9.337 9.337 0 0 0 4.121-.952 4.125 4.125 0 0 0-7.533-2.493M15 19.128v-.003c0-1.113-.285-2.16-.786-3.07M15 19.128v.106A12.318 12.318 0 0 1 8.624 21c-2.331 0-4.512-.645-6.374-1.766l-.001-.109a6.375 6.375 0 0 1 11.964-3.07M12 6.375a3.375 3.375 0 1 1-6.75 0 3.375 3.375 0 0 1 6.75 0Zm8.25 2.25a2.625 2.625 0 1 1-5.25 0 2.625 2.625 0 0 1 5.25 0Z" /> </svg> <svg class="h-5 w-5 text-gray-600" fill="none" viewBox="0 0 24 24" stroke="currentColor" stroke-width="2" > <path stroke-linecap="round" stroke-linejoin="round" d="M12 20.25c4.97 0 9-3.694 9-8.25s-4.03-8.25-9-8.25S3 7.444 3 12c0 2.104.859 4.023 2.273 5.48.432.447.74 1.04.586 1.641a4.483 4.483 0 0 1-.923 1.785A5.969 5.969 0 0 0 6 21c1.282 0 2.47-.402 3.445-1.087.81.22 1.668.337 2.555.337Z" /> </svg> <svg class="h-5 w-5 text-gray-600" fill="none" viewBox="0 0 24 24" stroke="currentColor" stroke-width="2"> <path stroke-linecap="round" stroke-linejoin="round" d="m20.25 7.5-.625 10.632a2.25 2.25 0 0 1-2.247 2.118H6.622a2.25 2.25 0 0 1-2.247-2.118L3.75 7.5M10 11.25h4M3.375 7.5h17.25c.621 0 1.125-.504 1.125-1.125v-1.5c0-.621-.504-1.125-1.125-1.125H3.375c-.621 0-1.125.504-1.125 1.125v1.5c0 .621.504 1.125 1.125 1.125Z" /> </svg> </div> </div> |
Create Card Form Template with AlpineJS
For the forms, we will utilize Alpine.js to seamlessly show/hide them as needed.
Each form will be thoughtfully designed as a self-contained component, ensuring modularity and ease of use.
We want to use the same BoardDetailView for creating both tasks and columns,
so I added a action parameter to the forms.
Let's start with boards/partial/create_card_form.html (with action=create_card):
1 2 3 4 5 6 7 8 9 10 11 12 13 14 15 16 17 18 19 20 21 22 23 24 25 26 27 28 29 30 31 32 33 34 35 36 37 38 | <div class="mt-4" x-data="{ showCardForm: false }"> <template x-if="!showCardForm"> <button @click="showCardForm = true" class="bg-white text-gray-500 font-bold py-2 px-4 rounded hover:bg-gray-100 transition duration-150 w-full"> <svg xmlns="http://www.w3.org/2000/svg" fill="none" viewBox="0 0 24 24" stroke-width="1.5" stroke="currentColor" class="inline size-6"> <path stroke-linecap="round" stroke-linejoin="round" d="M12 4.5v15m7.5-7.5h-15"/> </svg> Create Card </button> </template> <template x-if="showCardForm"> <form method="post"> {% csrf_token %} <input type="hidden" name="action" value="create_card"/> <input type="hidden" name="column_id" value="{{ column.pk }}"/> <textarea name="title" class="p-2 w-full border rounded mt-2" placeholder="Enter card text"></textarea> <div class="flex space-x-2 mt-2"> <button type="submit" class="bg-green-500 text-white font-bold py-2 px-4 rounded hover:bg-green-700 transition duration-150 flex items-center justify-center"> <svg xmlns="http://www.w3.org/2000/svg" fill="none" viewBox="0 0 24 24" stroke-width="1.5" stroke="currentColor" class="w-6 h-6 mr-1"> <path stroke-linecap="round" stroke-linejoin="round" d="m4.5 12.75 6 6 9-13.5"/> </svg> Add Card </button> <button @click="showCardForm = false" class="bg-gray-500 text-white font-bold py-2 px-2 rounded hover:bg-gray-700 transition duration-150 flex items-center justify-center"> <svg xmlns="http://www.w3.org/2000/svg" fill="none" viewBox="0 0 24 24" stroke-width="1.5" stroke="currentColor" class="w-6 h-6 mr-1"> <path stroke-linecap="round" stroke-linejoin="round" d="M6 18 18 6M6 6l12 12"/> </svg> </button> </div> </form> </template> </div> |
Create Column Template with AlpineJS
Secondly, here's the boards/partial/create_column_form.html (with action=create_column)
1 2 3 4 5 6 7 8 9 10 11 12 13 14 15 16 17 18 19 20 21 22 23 24 25 26 27 28 29 30 31 32 33 34 | <form method="post" class="w-72" x-data="{ addColumn: false }"> {% csrf_token %} <template x-if="!addColumn"> <button @click="addColumn = true" class="border-2 border-black bg-white text-black font-bold py-2 px-4 rounded hover:bg-gray-100 transition duration-150 w-full"> <svg xmlns="http://www.w3.org/2000/svg" fill="none" viewBox="0 0 24 24" stroke-width="1.5" stroke="currentColor" class="inline size-6"> <path stroke-linecap="round" stroke-linejoin="round" d="M12 4.5v15m7.5-7.5h-15"/> </svg> Create Column </button> </template> <template x-if="addColumn"> <div> <input type="hidden" name="action" value="create_column"/> <input type="text" name="title" x-model="newColumnName" placeholder="Enter column name" class="p-2 w-full border rounded"> <button type="submit" class="bg-green-500 text-white font-bold py-2 px-4 rounded hover:bg-green-700 transition duration-150 mt-2"> <svg xmlns="http://www.w3.org/2000/svg" fill="none" viewBox="0 0 24 24" stroke-width="1.5" stroke="currentColor" class="size-6"> <path stroke-linecap="round" stroke-linejoin="round" d="m4.5 12.75 6 6 9-13.5"/> </svg> </button> <button @click="addColumn = false" class="bg-gray-500 text-white font-bold py-2 px-4 rounded hover:bg-gray-700 transition duration-150 mt-2"> <svg xmlns="http://www.w3.org/2000/svg" fill="none" viewBox="0 0 24 24" stroke-width="1.5" stroke="currentColor" class="size-6"> <path stroke-linecap="round" stroke-linejoin="round" d="M6 18 18 6M6 6l12 12"/> </svg> </button> </div> </template> </form> |
Handle POST requests
We now have to treat the POST requests in our view. Let's update the BoardDetailView like so:
1 2 3 4 5 6 7 8 9 10 11 12 13 14 15 16 17 18 19 | @method_decorator(login_required(login_url=reverse_lazy('login')), name='dispatch', ) class BoardDetailView(DetailView): template_name = "boards/board_detail.html" model = Board def post(self, request, *args, **kwargs): self.object = self.get_object() if request.POST.get("action") == "create_column": title = request.POST.get("title") if title: Column.objects.create( board=self.object, title=title ) if request.POST.get("action") == "create_card": title = request.POST.get("title") column = get_object_or_404(Column, pk=int(request.POST.get("column_id"))) if title: Card.objects.create(title=title, column=column) return redirect("board_detail", pk=self.object.pk) |
Final Result
Here's what we get by putting everything together:
See you in the next part of this tutorial!