If you ever had to manage user access in a Django application and found it rather confusing, then this article is for you. Here are some of the subjects we will cover in this tutorial:
- what are the components of Django’s permission system
- authentication vs. authorization
- model-level vs. object-level permissions
- Django's model permission framework
- Django Groups
- Django Rules for implementing rule based, object level permissions
Here's what you need to know before getting started:
Frequently Asked Questions
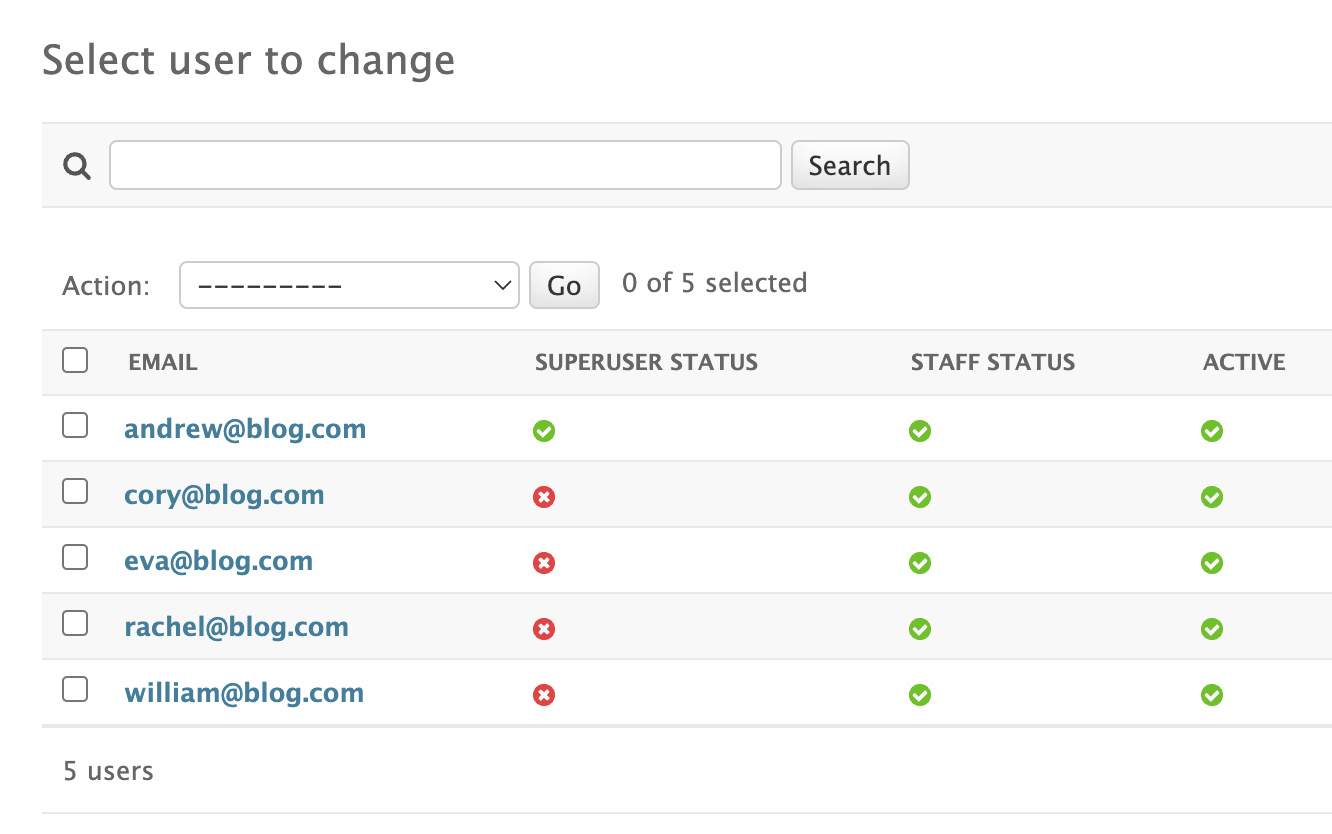
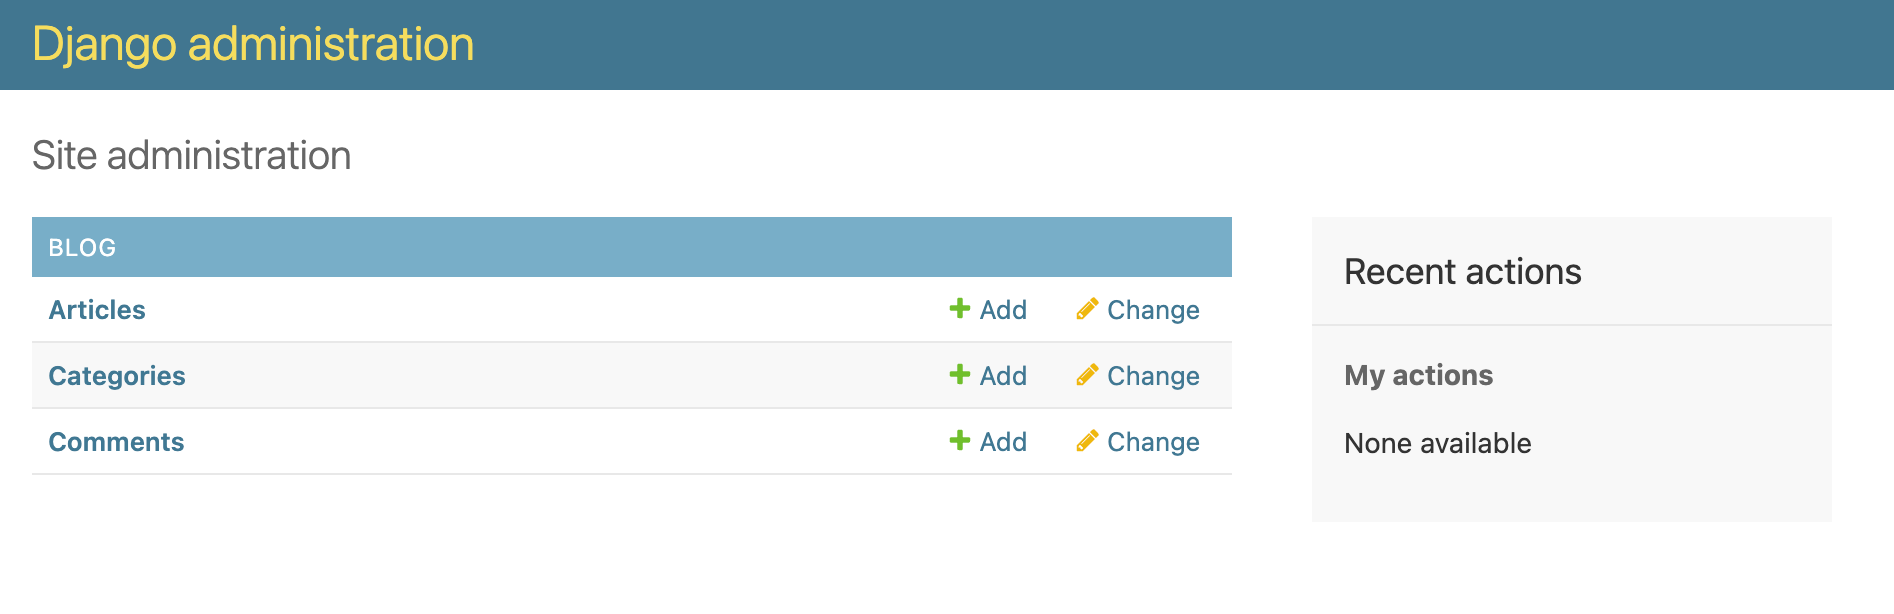
Let's first create some users. I have created a custom user model, but that doesn't really impact how things work. Here's how our user list looks like:
is_superuser always overrides permissions
One important observation is that regardless of how you set up permissions in Django, if the user
has the flag is_superuser set, it will be allowed to do anything. Thing of the command-line
sudo command.
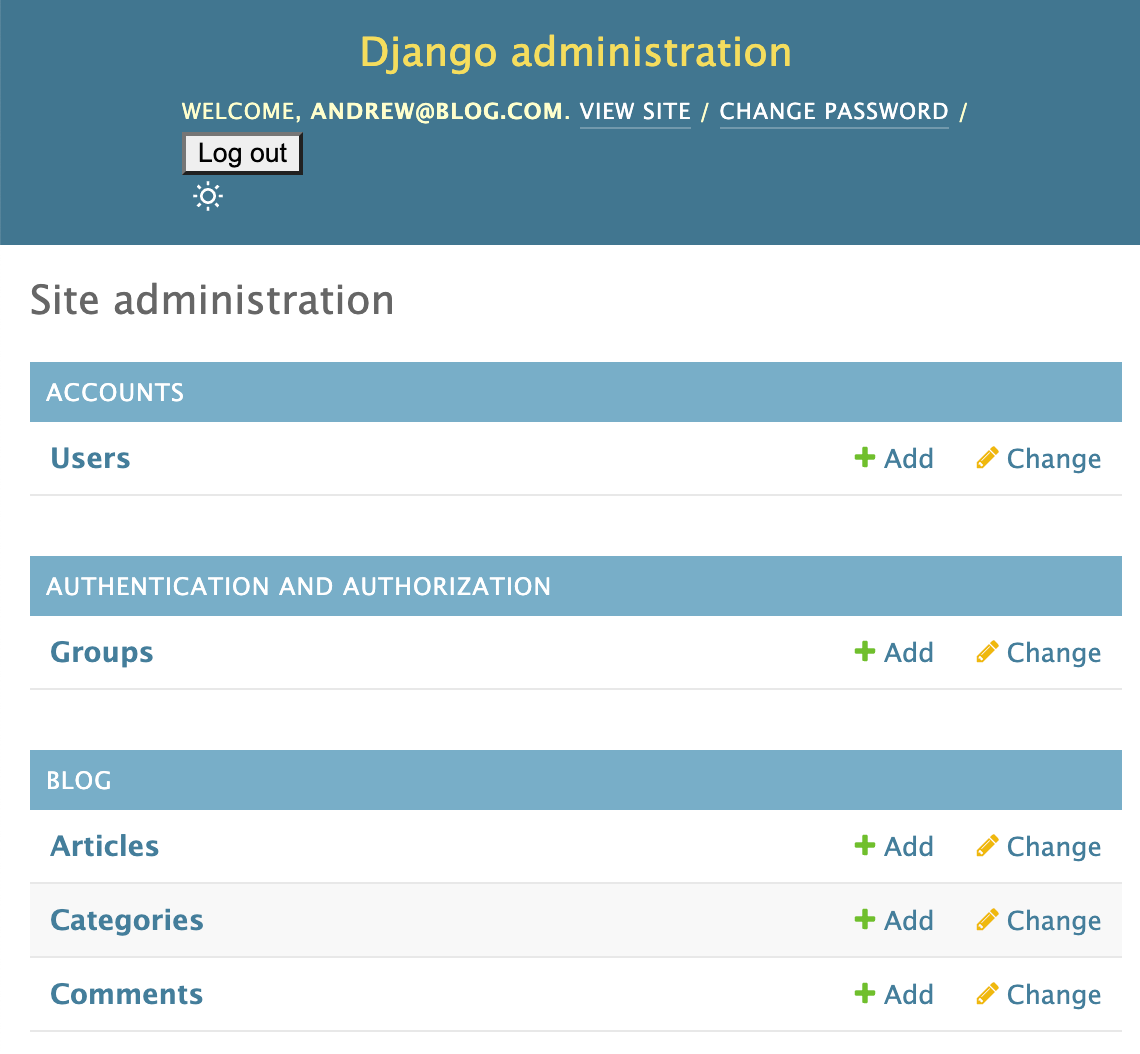
If you login with andrew@blog.com you will notice that you can view/edit/create/delete
everything. This is because andrew@blog.com has the is_superuser flag set.
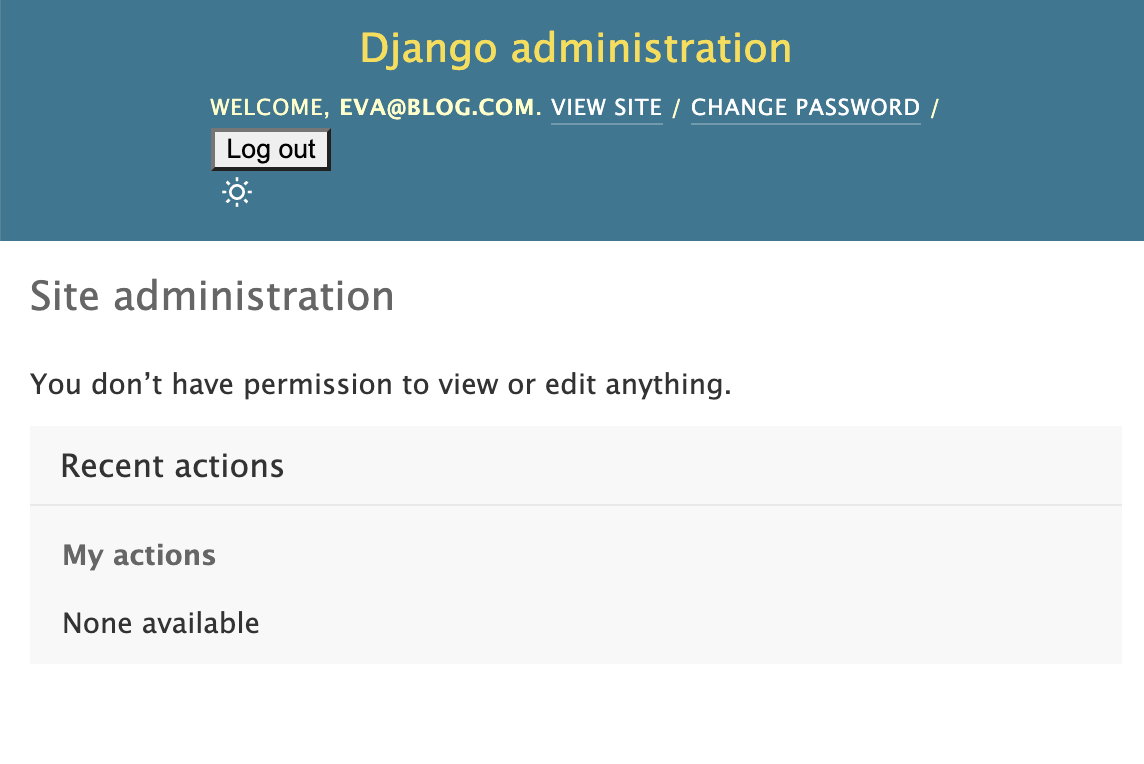
If you login with any other user you will notice that you can't view/edit/create/delete anything. This is because we haven't assigned any permissions yet.
Here are the initial models we are going to work with
1 2 3 4 5 6 7 8 9 10 11 12 13 14 15 16 17 18 19 20 21 22 23 24 25 26 27 28 29 30 31 32 33 34 35 36 37 38 39 40 41 42 43 44 45 46 47 48 49 50 51 52 53 54 55 56 57 58 59 60 61 | from django.db import models from django.contrib.auth import get_user_model UserModel = get_user_model() class Category(models.Model): name = models.CharField("Name", max_length=256) description = models.TextField("Description") class Meta: verbose_name_plural = "Categories" class Article(models.Model): class Status(models.TextChoices): DRAFT = "DRAFT", "Draft" PENDING_REVIEW = "PENDING_REVIEW", "Pending Review" PUBLISHED = "PUBLISHED", "Published" TRASH = "TRASH", "Trash" title = models.CharField("Title", max_length=256) body = models.TextField("Body") category = models.ForeignKey( Category, null=True, blank=True, on_delete=models.SET_NULL ) author = models.ForeignKey( UserModel, null=True, blank=True, on_delete=models.SET_NULL ) status = models.CharField( max_length=20, choices=Status.choices, default=Status.DRAFT ) created = models.DateTimeField(auto_now_add=True) modified = models.DateTimeField(auto_now=True) published = models.DateTimeField(null=True, blank=True) class Comment(models.Model): article = models.ForeignKey(Article, on_delete=models.CASCADE) text = models.CharField("Text", max_length=256) author = models.ForeignKey( UserModel, null=True, blank=True, on_delete=models.SET_NULL ) created = models.DateTimeField(auto_now_add=True) |
Building an Access Matrix
Let's suppose our access matrix for our blog looks like this. I have used the CRUD notation.
CRUD Acronym
CRUD is database lingo for:
[C]reate, [R]ead, [U]pdate, [D]elete.
If you are more familiar with REST APIs, here is the mapping:
[C]reate - POST[R]ead - GET[U]pdate - PUT/PATCH[D]elete - DELETE
| Admin | Editor | Writer | Contributor | Reader | |
|---|---|---|---|---|---|
| Comments | CRUD | CRUD | CR | CR | CR |
| Categories | CRUD | CRUD | R | R | R |
| Categories | CRUD | CRUD | CRU | RU | R |
Django's Model Permissions
Assigning Permissions to users
One way to do it is to assign the established permissions to each user according to the Access Matrix above.
Let's do it like this for one user and discuss why this approach is less than ideal.
We are going to use the user cory@blog.com to exemplify this (which is a contributor).
Let's authenticate as andrew@blog.com since he is the only user with the is_superuser flag set.
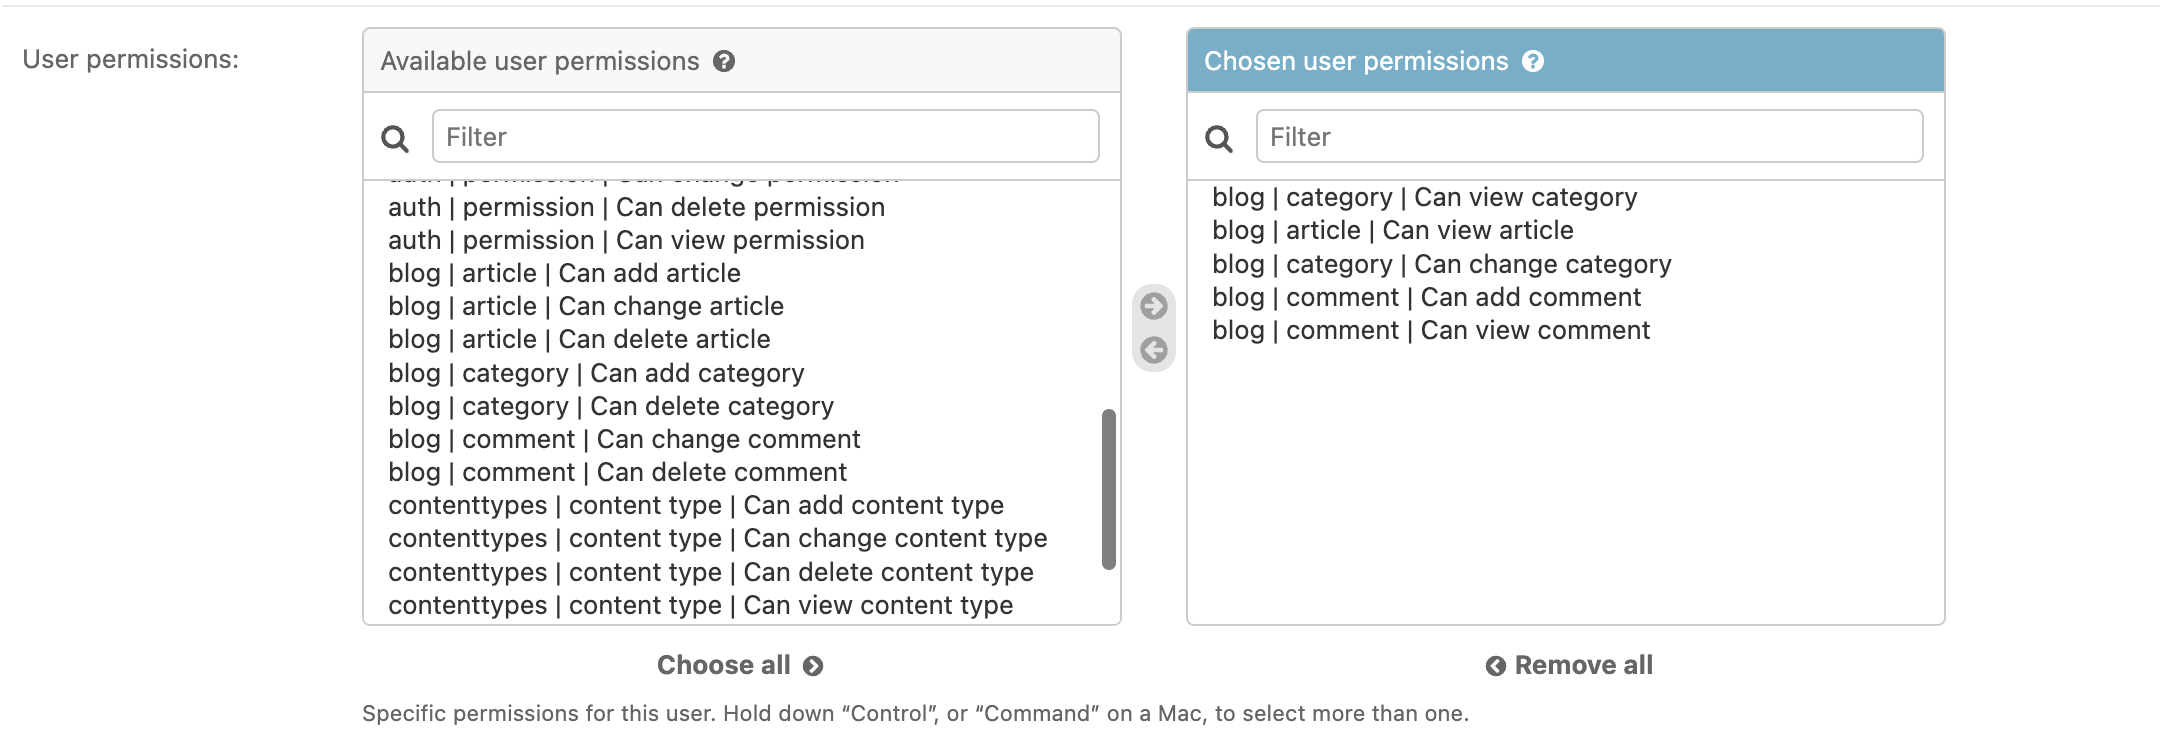
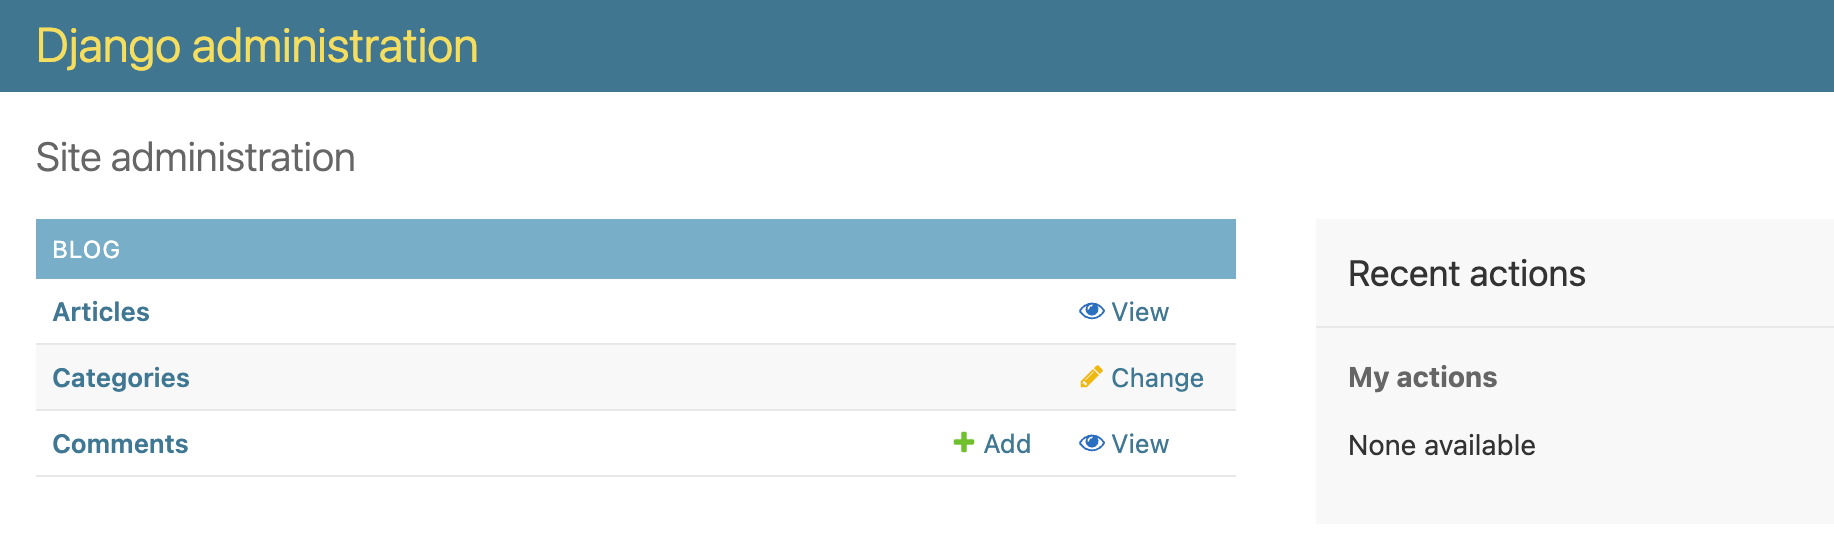
Let's now authenticate as cory@blog.com and see how out admin panel looks like:
Assigning Permissions to groups
A better way of doing this is to use the Group model.
We can assign permissions to a Group and then assign several users to this group.
For our use case we can create the following groups:
- Editors
- Writers
- Contributors
- Readers
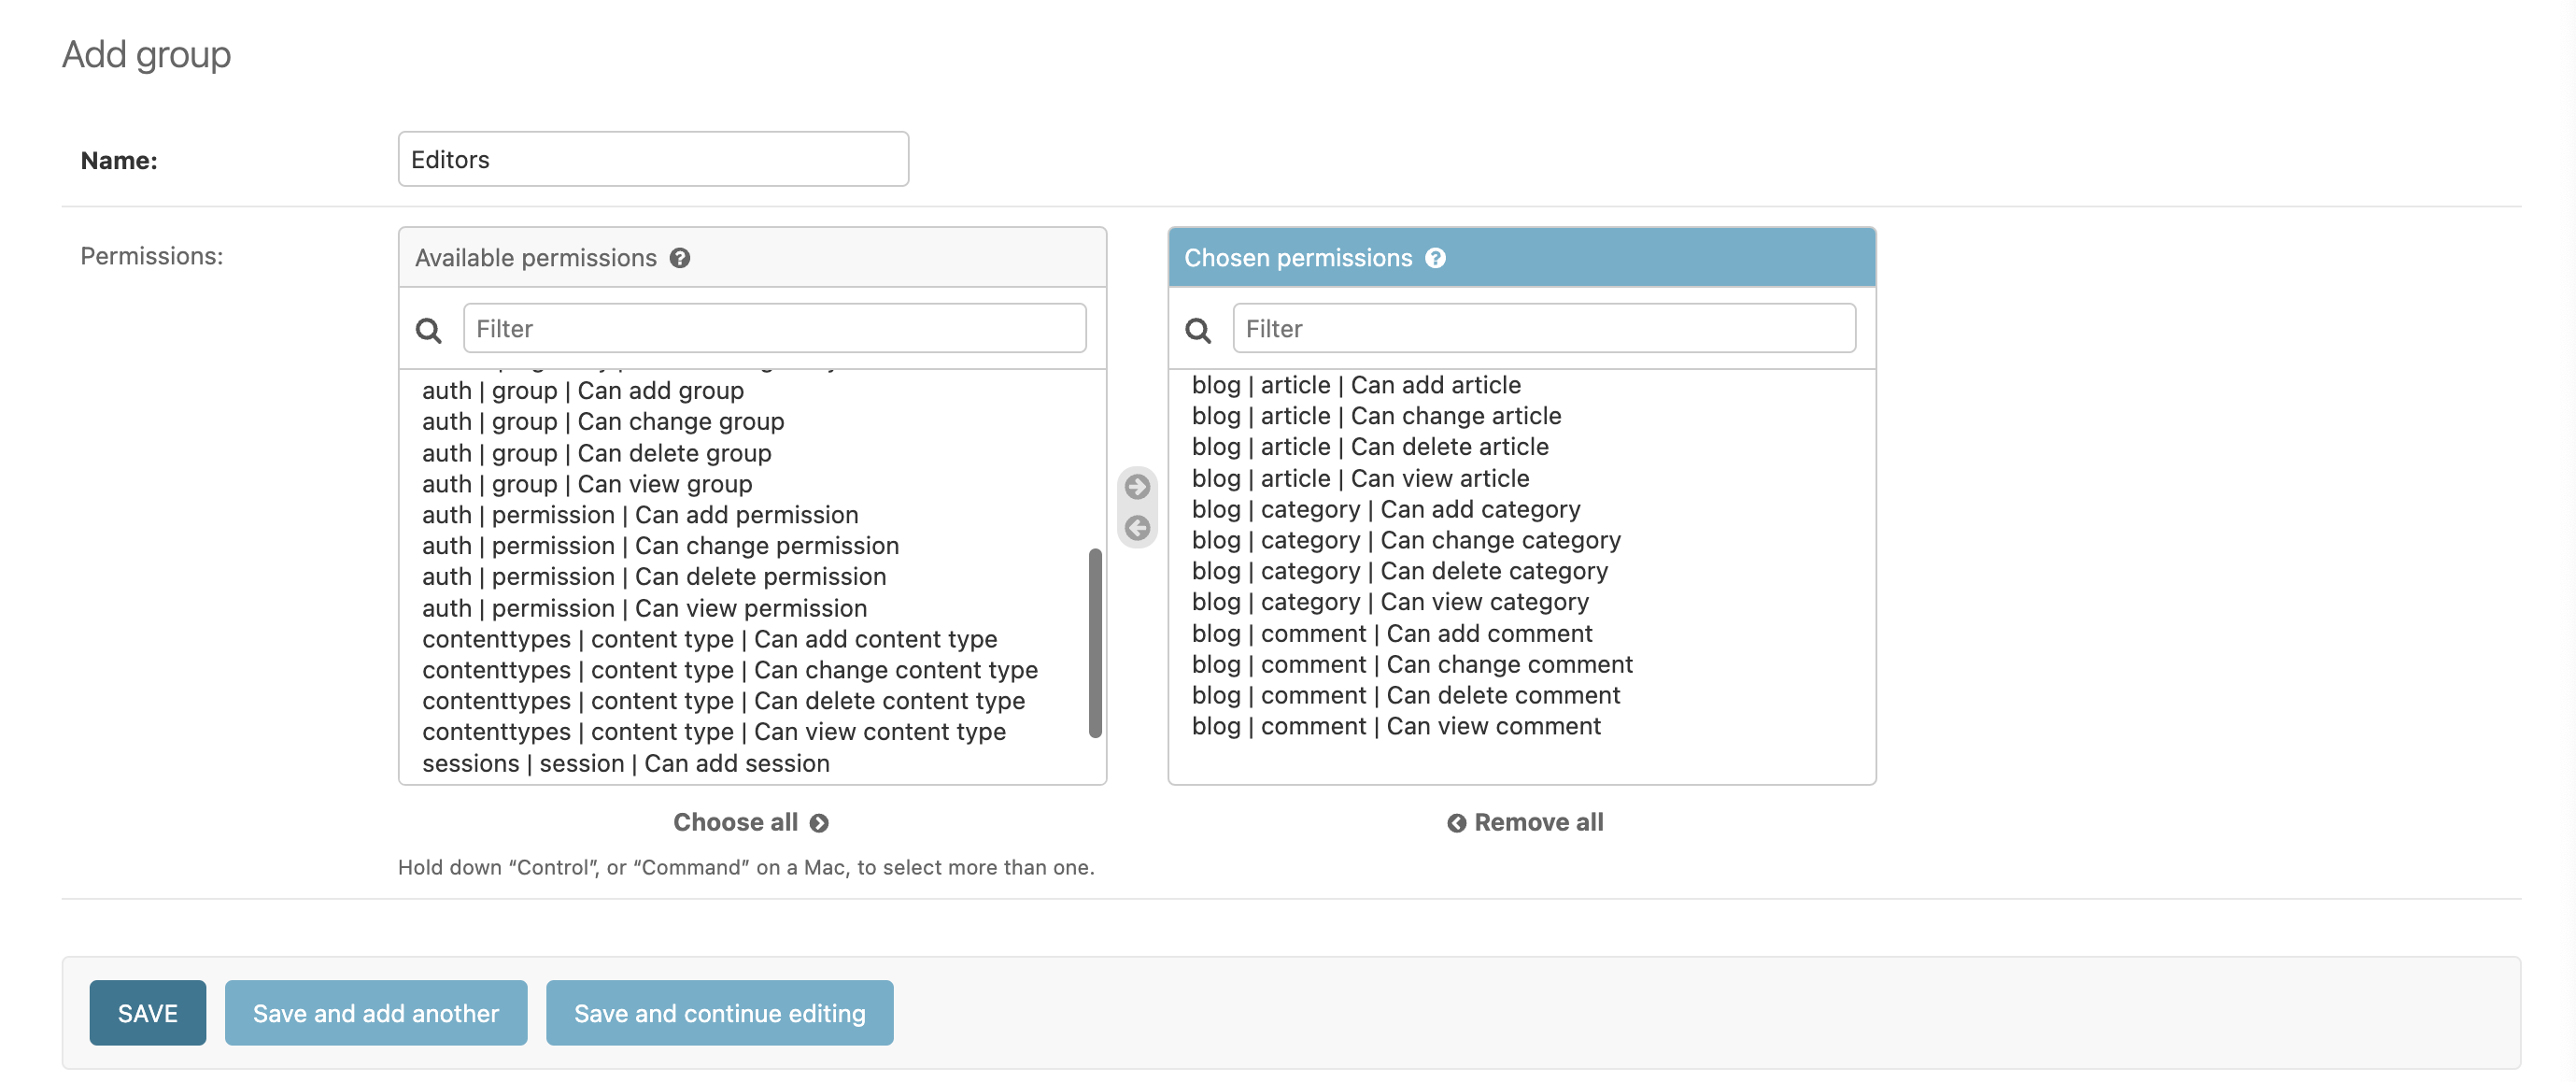
Let's create an Editors group. Here's how that looks:
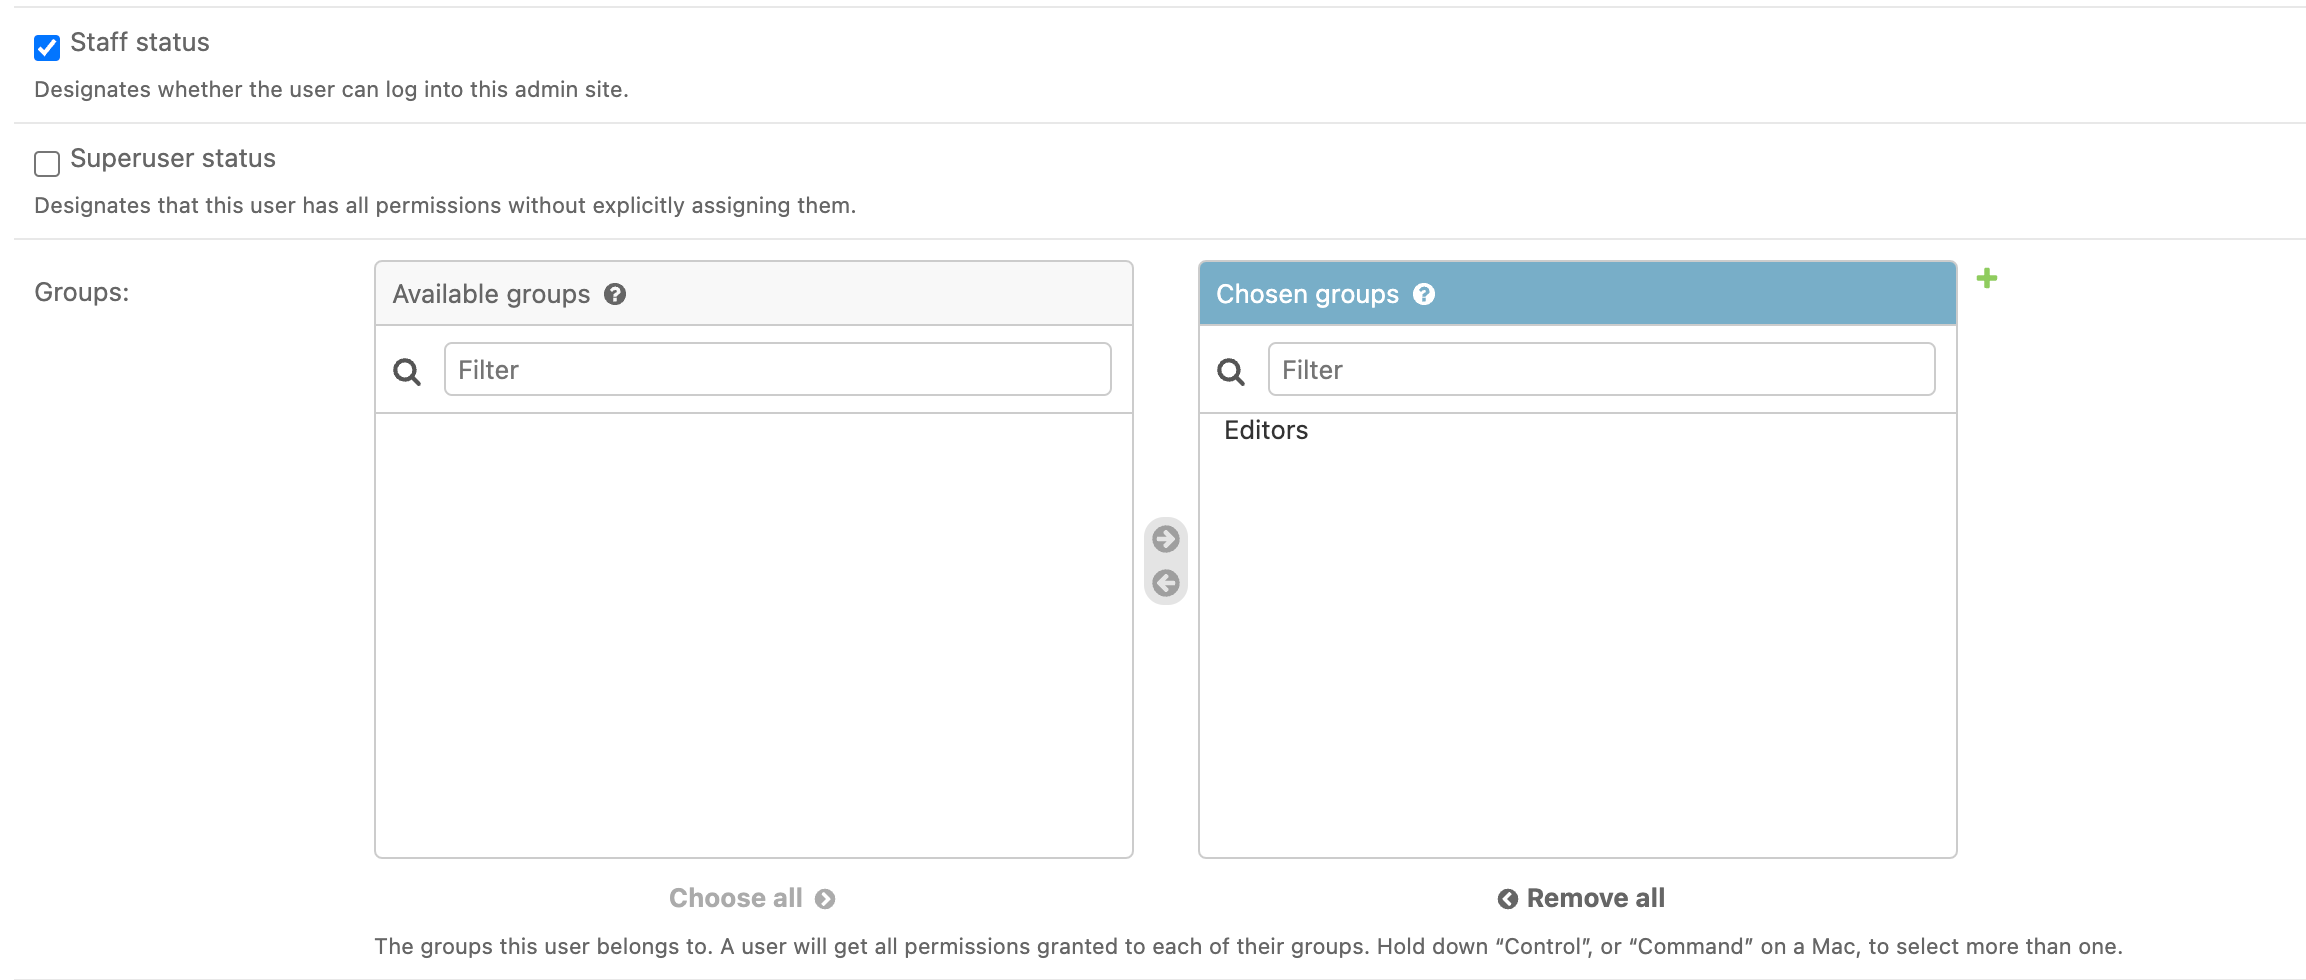
Now let's assign eva@blog.com to this newly created group:
Let's now authenticate as eva@blog.com and see how out admin panel looks like:
Checking Permissions in Views
Django Admin is very well integrated with the permission system. However, the permissions should also be checked outside the admin area. Let's suppose we have a Django view for reading and editing an article. Here's how we can check permissions inside a view:
1 2 3 4 5 6 7 8 9 10 11 12 13 14 15 16 17 18 19 20 21 22 23 24 25 26 | from django.http import HttpResponse from django.shortcuts import render, get_object_or_404, redirect from django.contrib.auth.decorators import permission_required, login_required from blog.forms import ArticleForm from blog.models import Article @login_required @permission_required("blog.view_article") def article_detail(request, article_id): article = get_object_or_404(Article, pk=article_id) if request.method == "POST": if not request.user.has_perm("blog.change_article"): return HttpResponse('Unauthorized', status=401) form = ArticleForm(instance=article, data=request.POST) if form.is_valid(): form.save() return redirect("article_detail", article_id=article_id) else: form = ArticleForm(instance=article) return render(request, "blog/article_detail.html", {"form": form}) |
Notice how we used the permission_required decorator to check the blog.view_article
and we used the user.has_perm method for checking the blog.change_article permission.run
Creating Custom Permissions
Of course, just relying on the default view/change/add/delete permissions will soon prove insufficient.
Suppose we want to control who can publish an article on our platform, making it visible to all website viewers.
Surely we don't want to give this privilege to everybody. Here's how to achieve that.
We need to modify the Article model:
1 2 3 4 5 6 7 8 9 10 11 12 13 14 15 16 17 18 19 20 21 22 23 24 25 26 27 28 29 30 31 32 33 34 35 36 37 38 39 40 41 42 43 44 45 46 47 48 49 | from django.core.exceptions import PermissionDenied from django.db import models from django.utils.timezone import now class Article(models.Model): class Status(models.TextChoices): DRAFT = "DRAFT", "Draft" PENDING_REVIEW = "PENDING_REVIEW", "Pending Review" PUBLISHED = "PUBLISHED", "Published" TRASH = "TRASH", "Trash" title = models.CharField("Title", max_length=256) body = models.TextField("Body") category = models.ForeignKey( Category, null=True, blank=True, on_delete=models.SET_NULL ) author = models.ForeignKey( UserModel, null=True, blank=True, on_delete=models.SET_NULL ) status = models.CharField( max_length=20, choices=Status.choices, default=Status.DRAFT ) created = models.DateTimeField(auto_now_add=True) modified = models.DateTimeField(auto_now=True) published = models.DateTimeField(null=True, blank=True) class Meta: permissions = ( ("publish_article", "Can publish article"), ) def publish(self, user): if not user.has_perm("blog.publish_article"): raise PermissionDenied() self.status = Article.Status.PUBLISHED self.published = now() self.save() |
Notice how we added the Meta section, specifying a new permission.
In order for this new permission to be picked up by Django, make sure to run python manage.py makemigrations
followed by python manage.py migrate.
Also notice how the publish method checks whether the user performing the action has the appropriate permission.
Let's make sure we can assign the new permission:
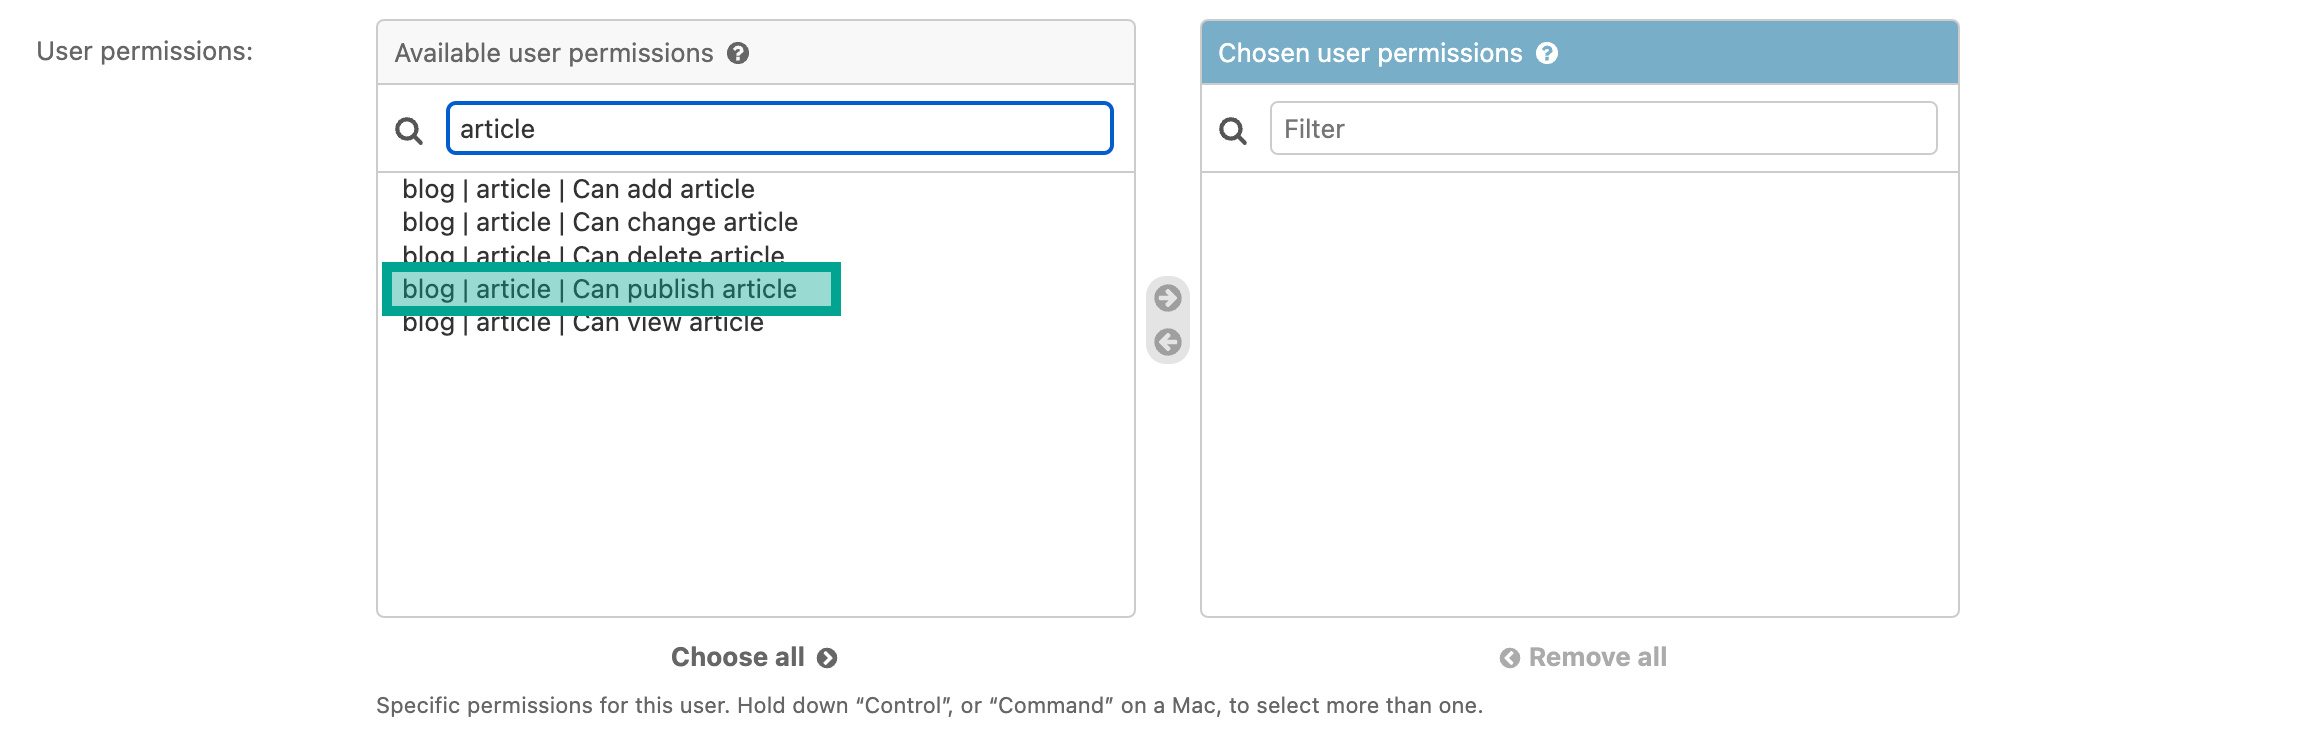
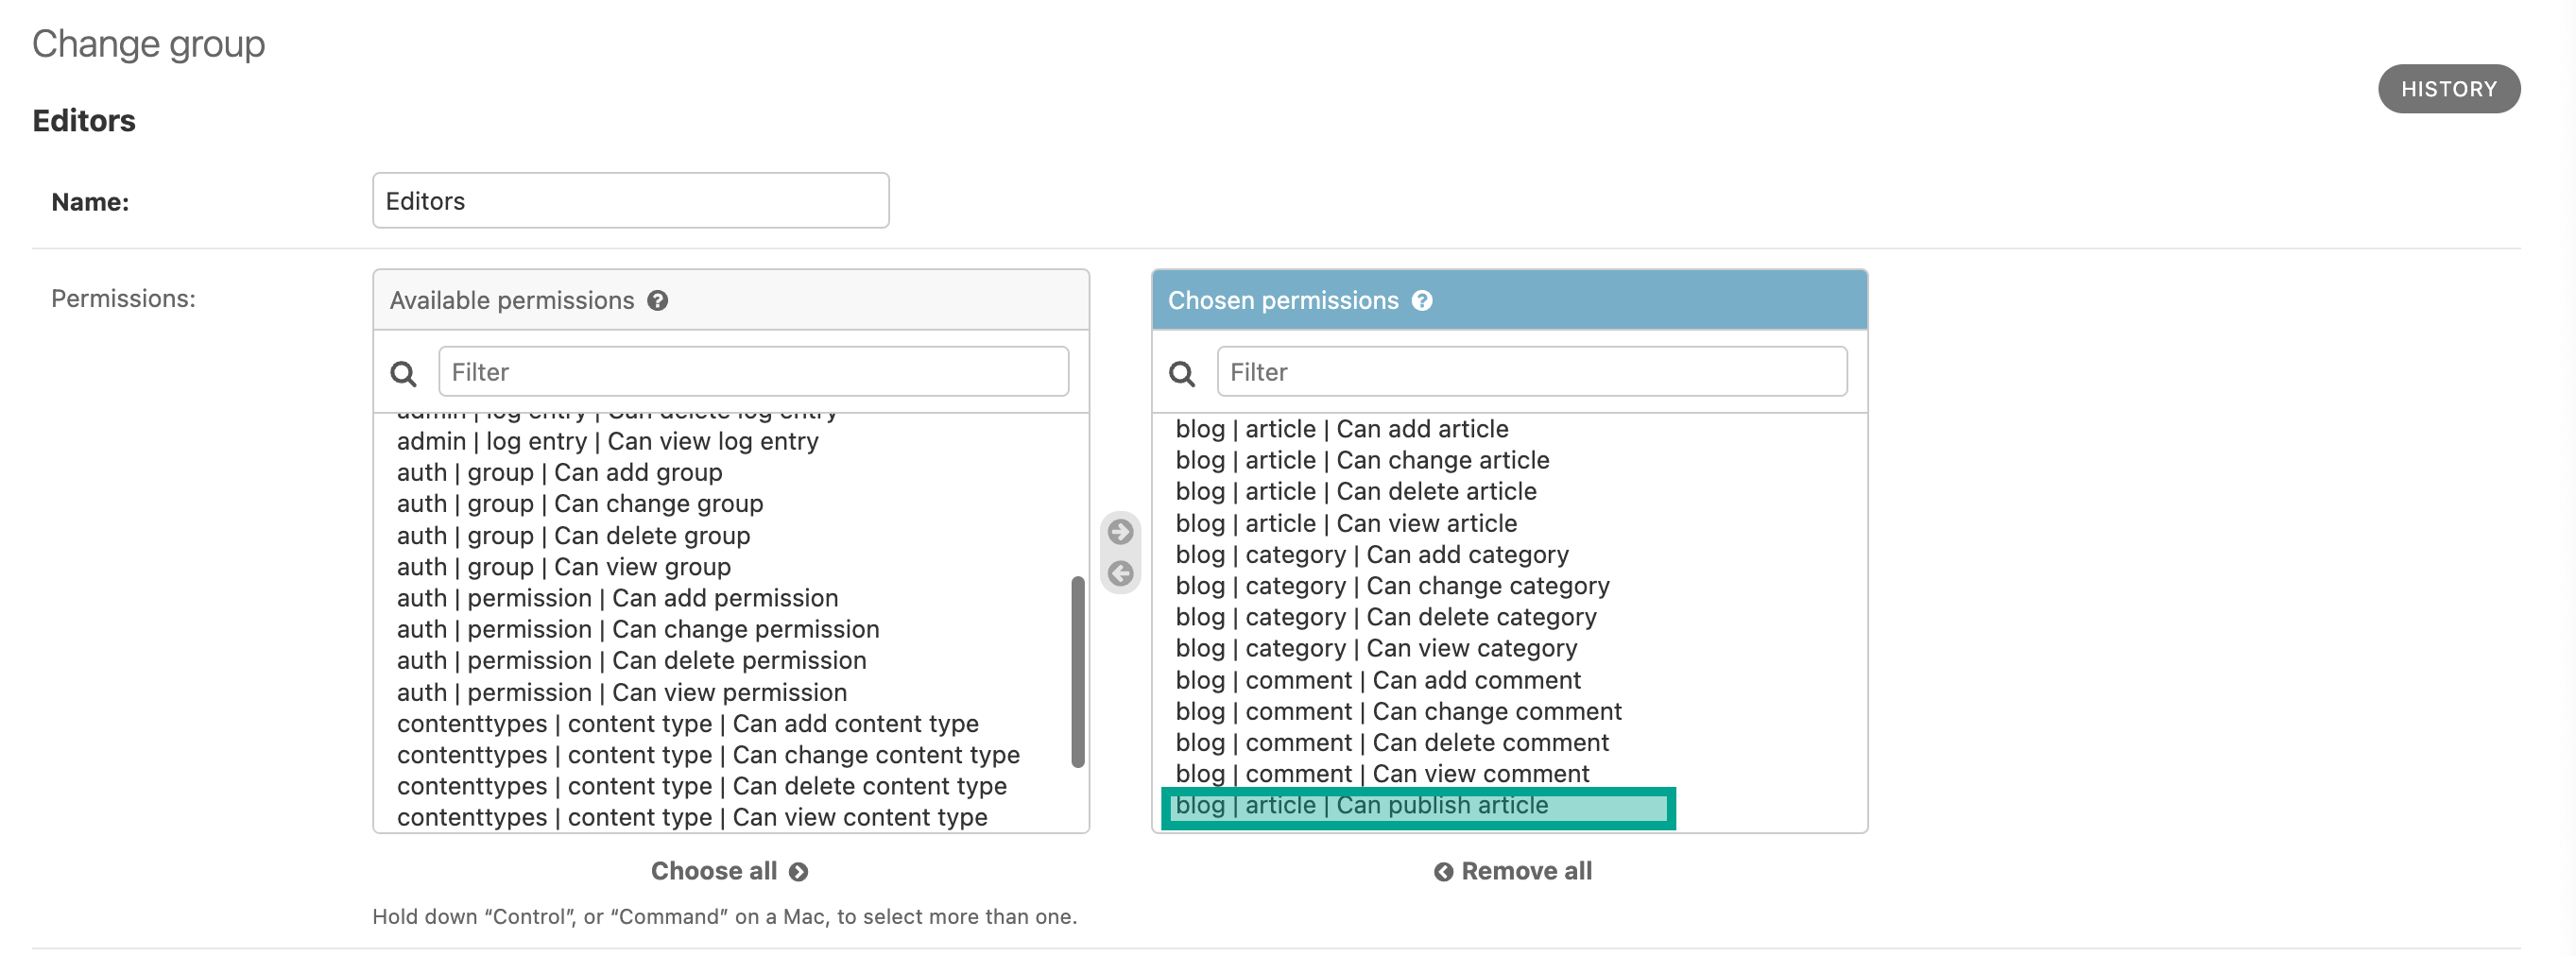
Let's add the new permission to the Editors group:
Checking Custom permissions in the admin
Django Admin checks the default permissions out of the box. How about checking our newly created custom permission?
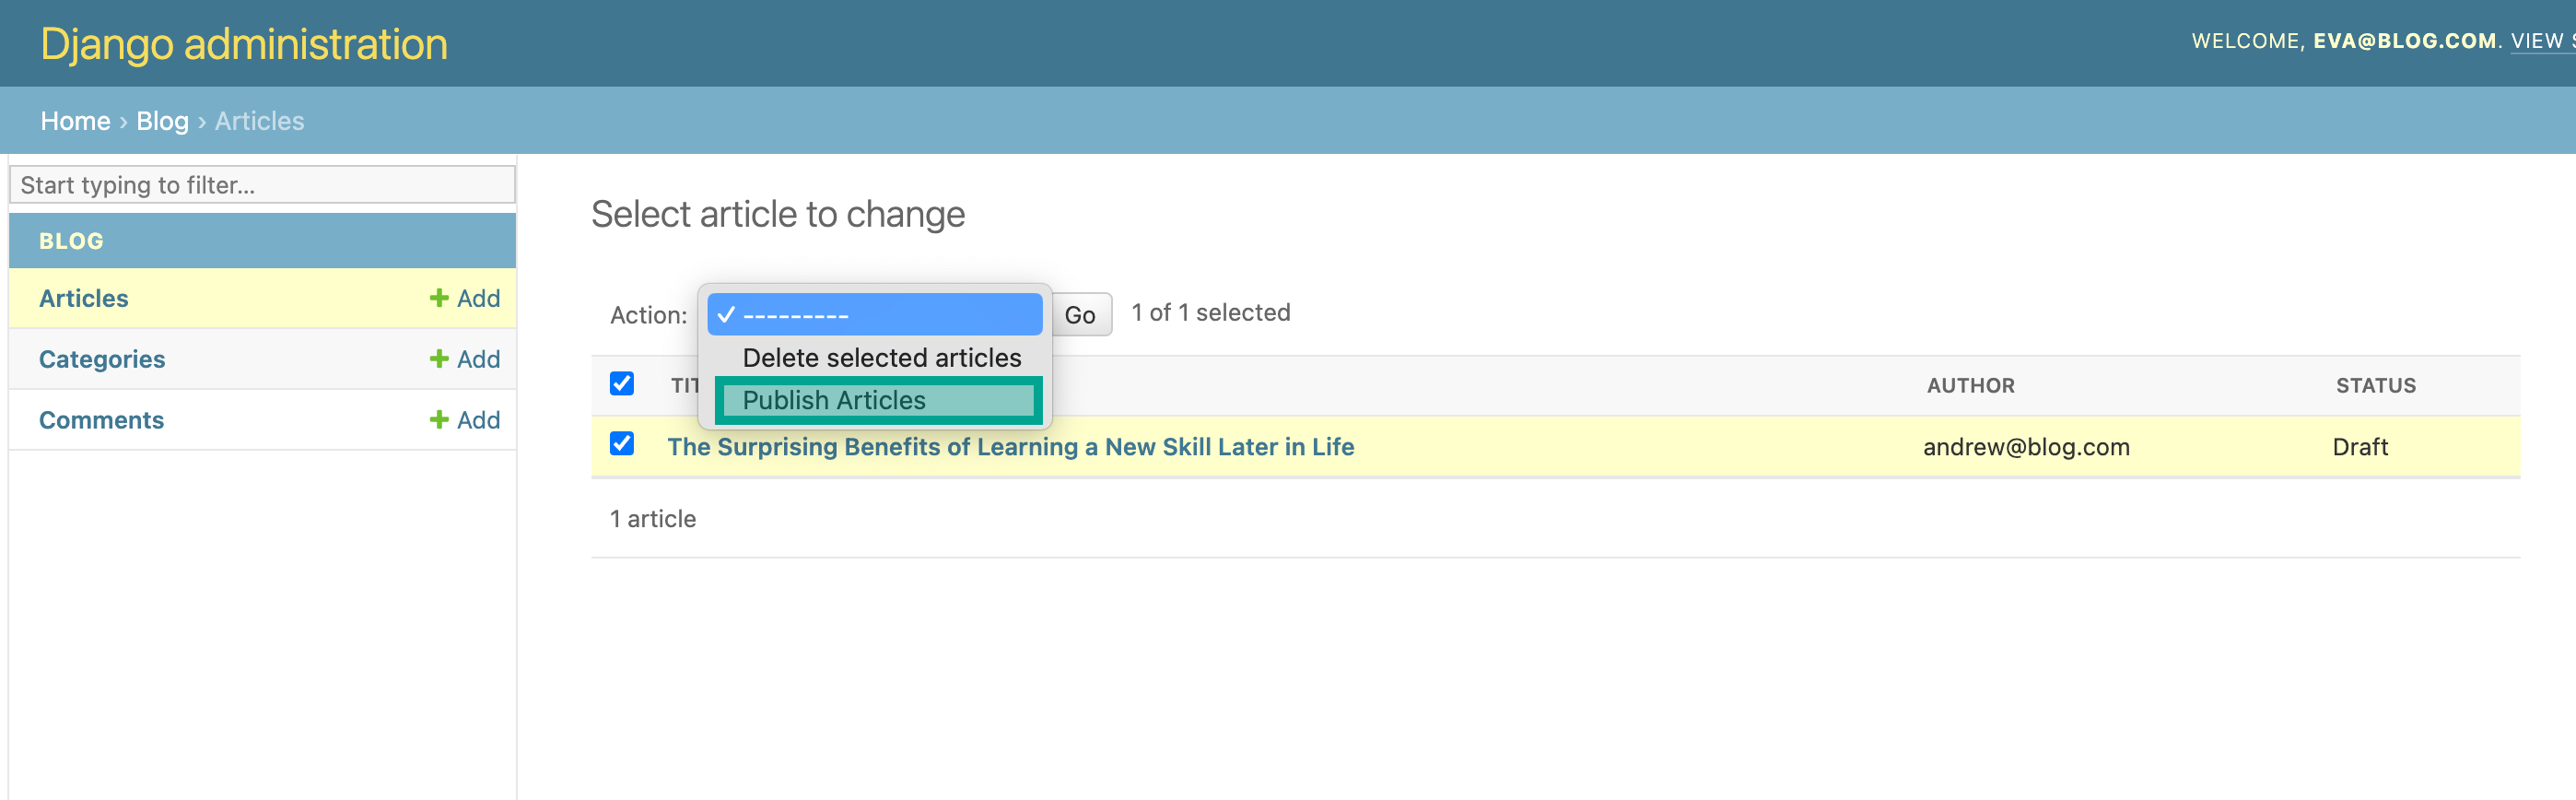
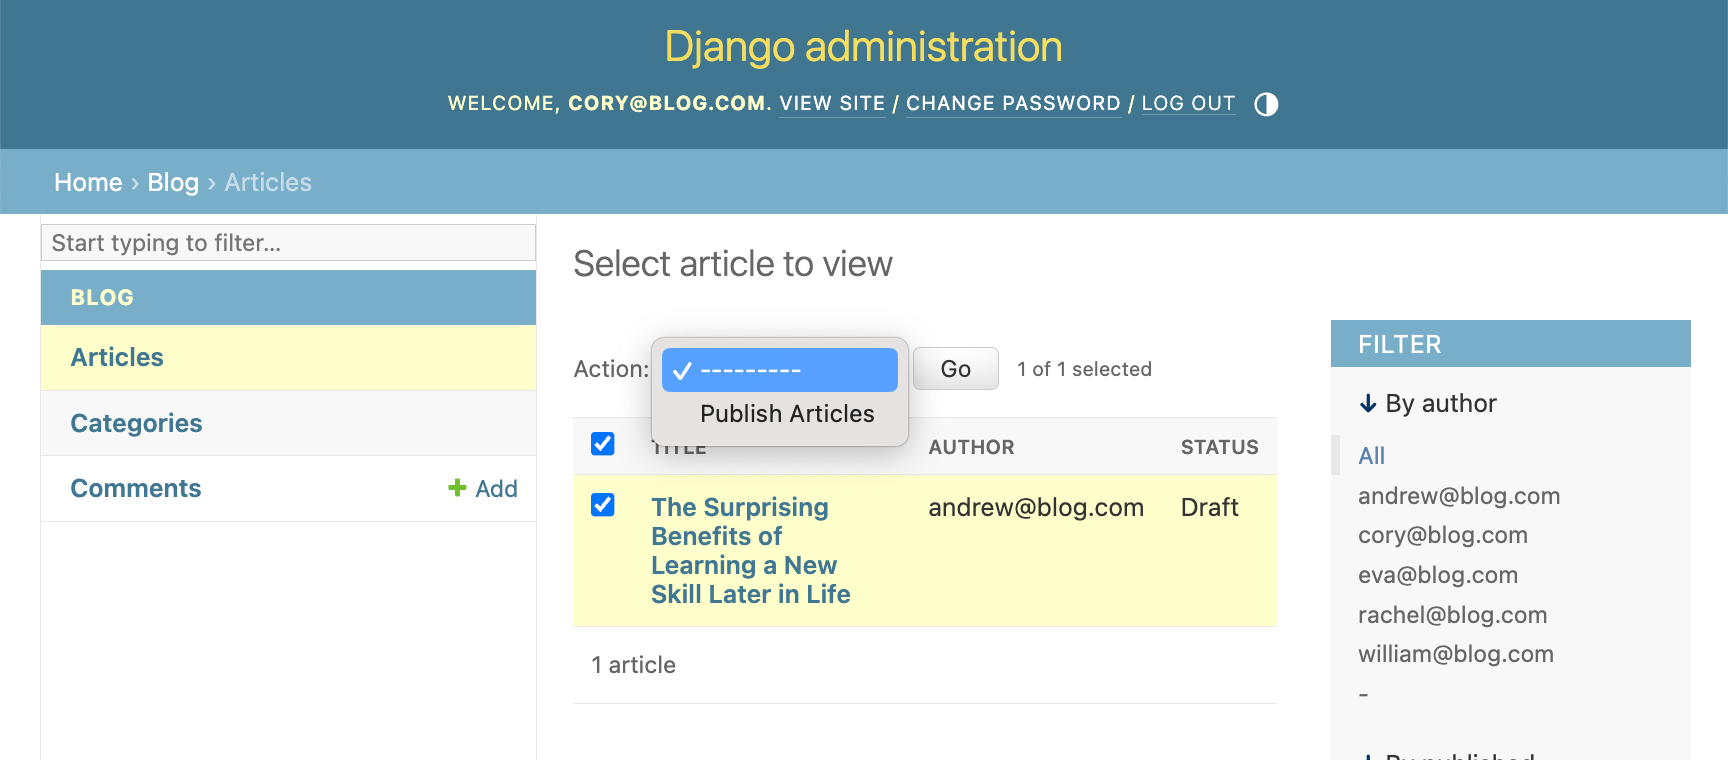
Let's create a custom admin action and have it available only to those having the publish_article permission.
Here's the code for that:
1 2 3 4 5 6 7 8 9 10 11 12 13 14 15 16 17 18 19 20 21 22 23 | from django.contrib import admin from django.contrib.admin import ModelAdmin from .models import Article, Category, Comment @admin.action(description="Publish Articles") def publish_article(modeladmin, request, queryset): for article in queryset: article.publish(request.user) @admin.register(Article) class ArticleAdmin(ModelAdmin): list_display = ('title', 'author', 'status') list_filter = ('author', 'published', 'status', 'created', 'modified') actions = [publish_article] def get_actions(self, request): actions = super(ArticleAdmin, self).get_actions(request) if not request.user.has_perm("blog.publish_article"): del actions["publish_article"] return actions |
Notice how in case the user doesn't have the publish_article permission, we remove that action from the
dictionary of available actions. Let's authenticate with eva@blog.com and check whether we can now publish
articles:
Object Level Permissions
If you need a more granular permissions, than object level permissions are what you need. There are two main Django libraries that implement two main approaches of Object Level Permissions:
- Rule based approach - The permissions are handled in code, so there is usually nothing stored in the database. This is the approach Django Rules takes. Here's an example of such a rule: "Only authors of an article can publish it"
- Explicit permission approach - This is the approach Django Guardian takes. A permission needs to specifically stored for each object in the database
Let's start by exploring Django Rules:
Django Rules
Installing Django Rules
Installing Django Rules goes like this:
- Run
pip install rules - Add
"rules"to your project'sINSTALLED_APPSinsettings.pyfile - Add
"rules.permissions.ObjectPermissionBackend"to theAUTHENTICATION_BACKENDSinsettings.pyfile
1 2 3 4 | AUTHENTICATION_BACKENDS = ( 'django.contrib.auth.backends.ModelBackend', 'rules.permissions.ObjectPermissionBackend', ) |
AUTHENTICATION_BACKENDS
AUTHENTICATION_BACKENDS is a list of classes that provide a way of authenticating the user.
You can create several authentication backends for authenticating a user via different methods: username/password, magic link, some kind of token, etc ...
However, authentication backends are also used for checking permissions. When we ask whether a user
has some permission, Django goes through this list and if it finds a backend that returns True
then the user has that permission. False otherwise.
Here's how simple and lightweight ObjectPermissionBackend is:
1 2 3 4 5 6 7 8 9 10 11 12 13 | def has_perm(name, *args, **kwargs): return permissions.test_rule(name, *args, **kwargs) class ObjectPermissionBackend(object): def authenticate(self, *args, **kwargs): return None def has_perm(self, user, perm, *args, **kwargs): return has_perm(perm, user, *args, **kwargs) def has_module_perms(self, user, app_label): return has_perm(app_label, user) |
Here's Django's ModelBackend
1 2 3 4 5 6 7 8 9 10 11 12 13 14 15 16 17 18 19 20 21 22 23 24 25 | class ModelBackend(BaseBackend): """ Authenticates against settings.AUTH_USER_MODEL. """ def authenticate(self, request, username=None, password=None, **kwargs): if username is None: username = kwargs.get(UserModel.USERNAME_FIELD) if username is None or password is None: return try: user = UserModel._default_manager.get_by_natural_key(username) except UserModel.DoesNotExist: # Run the default password hasher once to reduce the timing # difference between an existing and a nonexistent user (#20760). UserModel().set_password(password) else: if user.check_password(password) and self.user_can_authenticate(user): return user # ... def has_perm(self, user_obj, perm, obj=None): return user_obj.is_active and super().has_perm(user_obj, perm, obj=obj) # ... |
Going up the class hierarchy, here's ModelBackend:
1 2 3 4 5 6 7 8 | class BaseBackend: def authenticate(self, request, **kwargs): return None # ... def has_perm(self, user_obj, perm, obj=None): return perm in self.get_all_permissions(user_obj, obj=obj) |
Notice how the Rules' ObjectPermissionBackend is always returning None
in the authenticate method. This means that this backend, doesn't facilitate any user authentication.
It is only used for checking permissions. Probably a bit confusing since they are called AUTHENTICATION_BACKENDS.
Creating Permission Rules
Models who's access you want to manage via Django Rules, need to extend the RulesModel.
In case you are doing fancy things with your models and can't directly extend the RulesModel, there are
alternatives: Permissions in models
For the sake of conciseness, let's focus on the most common scenario. Here's how to set up Django Rules permissions
for a Django model. We are going to use of course the Article model.
In order to build permission rules, we need to write predicates. In this context, a predicate si a function that accepts a user and an object as arguments. Then these predicates can be composed using logical operators. Here's how we can migrate the publish action to Object Level Permissions using Django Rules:
1 2 3 4 5 6 7 8 9 10 11 12 13 14 15 16 17 18 19 20 21 22 23 24 25 26 27 28 29 30 31 32 33 34 35 36 37 38 39 40 41 42 43 44 45 46 47 48 49 50 51 52 53 54 55 56 57 58 59 60 61 62 63 64 65 66 67 68 69 70 71 72 73 74 75 | import rules from django.core.exceptions import PermissionDenied from django.db import models from django.utils.timezone import now from django.contrib.auth import get_user_model from rules.contrib.models import RulesModel UserModel = get_user_model() # ... @rules.predicate def is_author(user, article): return article.author == user def has_role(role): @rules.predicate def _check_role(user, _): return user.role == role return _check_role class Article(RulesModel): class Status(models.TextChoices): DRAFT = "DRAFT", "Draft" PENDING_REVIEW = "PENDING_REVIEW", "Pending Review" PUBLISHED = "PUBLISHED", "Published" TRASH = "TRASH", "Trash" title = models.CharField("Title", max_length=256) body = models.TextField("Body") category = models.ForeignKey( Category, null=True, blank=True, on_delete=models.SET_NULL ) author = models.ForeignKey( UserModel, null=True, blank=True, on_delete=models.SET_NULL ) status = models.CharField( max_length=20, choices=Status.choices, default=Status.DRAFT ) created = models.DateTimeField(auto_now_add=True) modified = models.DateTimeField(auto_now=True) published = models.DateTimeField(null=True, blank=True) class Meta: rules_permissions = { "publish": ( is_author | has_role(User.Role.EDITOR) | rules.is_group_member("editors") ), } def publish(self, user): if not user.has_perm("blog.publish_article", self): raise PermissionDenied() self.status = Article.Status.PUBLISHED self.published = now() self.save() |
Note how we've added the article object (self) as an argument to the user.has_perm function.
Let's now break down those predicates:
is_author- is a custom predicate we've written that checks if a user is the author of an articlehas_role- is a function that accepts a parameter and returns a predicate. It checks whether a user has a certain rolerules.is_group_memberis a function that comes with Django Rules and checks if a user belongs to a group
Here is how we can update the ModelAdmin for the Article model:
1 2 3 4 5 6 7 8 9 10 11 12 13 14 15 16 17 18 19 20 21 22 23 24 25 26 27 28 | from django.contrib import admin, messages from django.contrib.admin import ModelAdmin from django.core.exceptions import PermissionDenied from .models import Article @admin.action(description="Publish Articles") def publish_article(modeladmin, request, queryset): for article in queryset: try: article.publish(request.user) messages.success( request, f"You successfully published {article}" ) except PermissionDenied: messages.error( request, f"You do not have permission to publish {article}" ) @admin.register(Article) class ArticleAdmin(ModelAdmin): list_display = ('title', 'author', 'status') list_filter = ('author', 'published', 'status', 'created', 'modified') actions = [publish_article] |
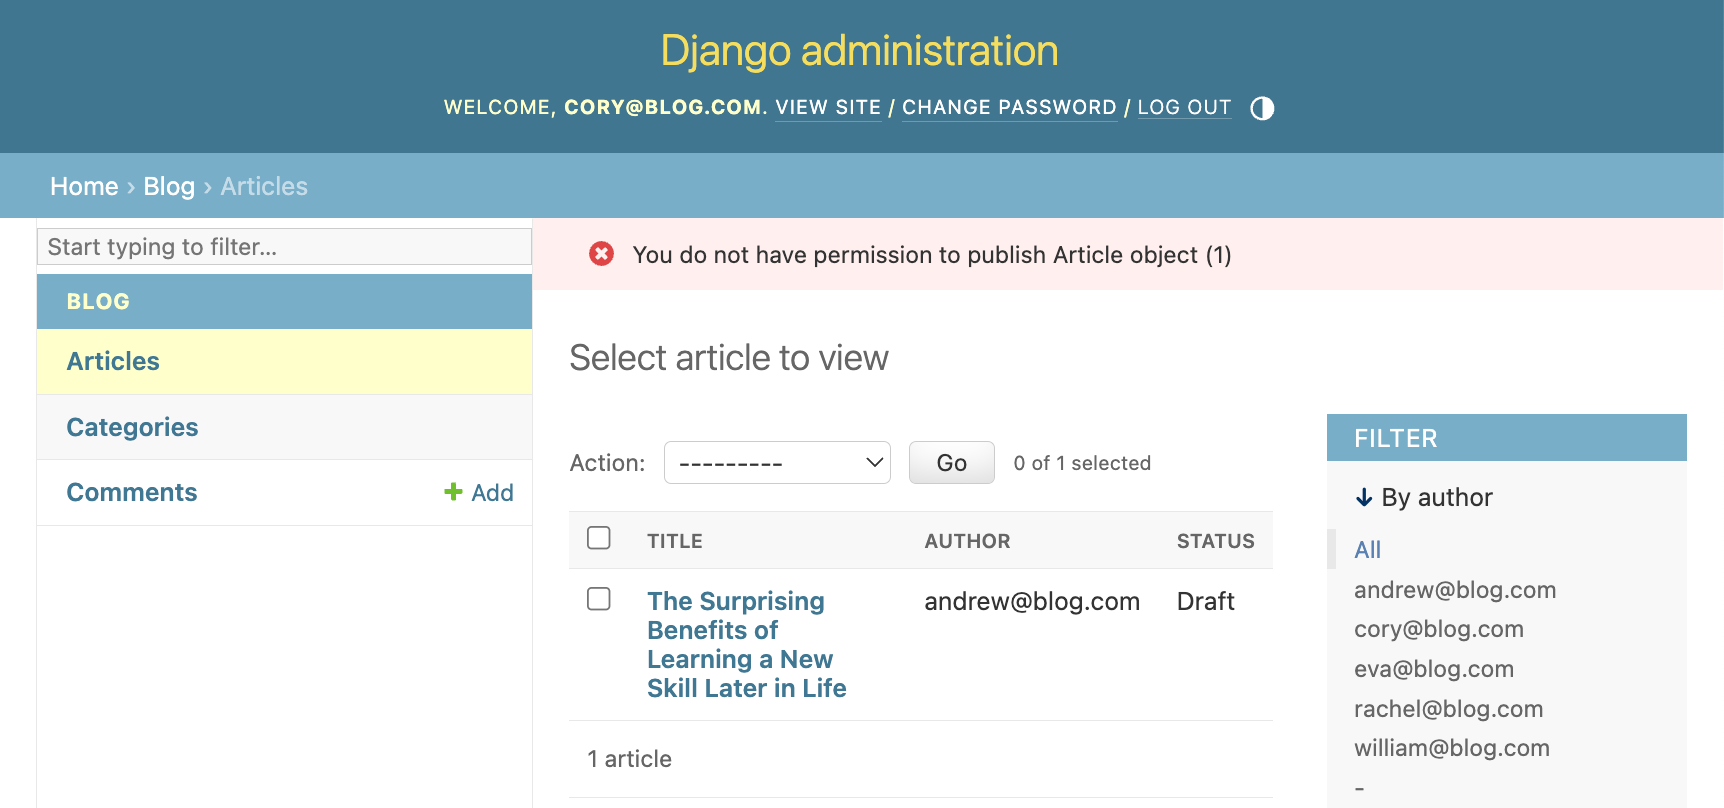
Let's take it for a spin. Log in as cory@blog.com and try to publish an article. Keep in mind that cory@blog.com has a Contributor role, so we expect to get an error:
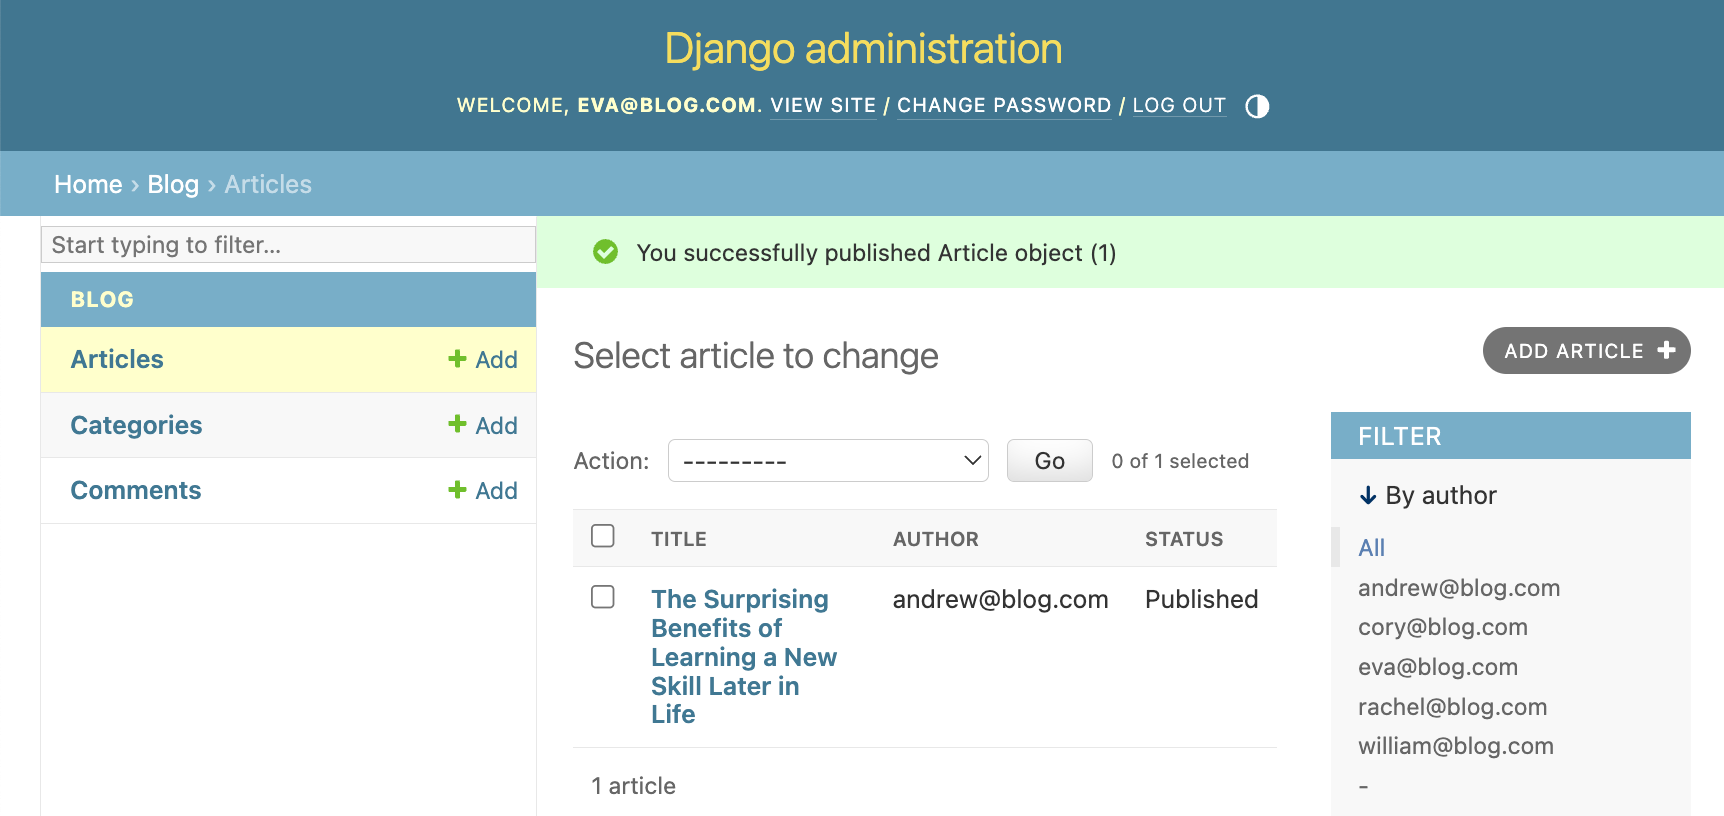
Let's now try to do the same as an Editor. Log in as eva@blog.com and try to publish an article. We should succeed:
As exercise, try logging in as william@blog.com, write an article and then try publishing it.
It should of course succeed, according to the is_author predicate.
Checking permissions in views
Let's now look at one of the most common ways of checking permissions in a Django application: view decorators.
The most common way, simply using the User object, we've explored in the Article model:
user.has_perm("blog.publish_article", self).
Here's how view decorators work:
1 2 3 4 5 6 7 8 9 10 11 12 | from rules.contrib.views import permission_required, objectgetter @login_required @permission_required( "blog.publish_article", fn=objectgetter(Article, 'article_id'), raise_exception=True ) def article_publish(request, article_id): # Do some stuff here return render(request, "blog/article_publish.html") |
Django Guardian
Installing Django Guardian
Here's how to add Django Guardian to your Django project:
- Run
pip install django-guardian - Add
"guardian"to your project'sINSTALLED_APPSinsettings.pyfile - Add
"guardian.backends.ObjectPermissionBackend"to theAUTHENTICATION_BACKENDSinsettings.pyfile - Run
python manage.py migrateto apply the migrations that come with Django Guardian
Django Guardian Admin
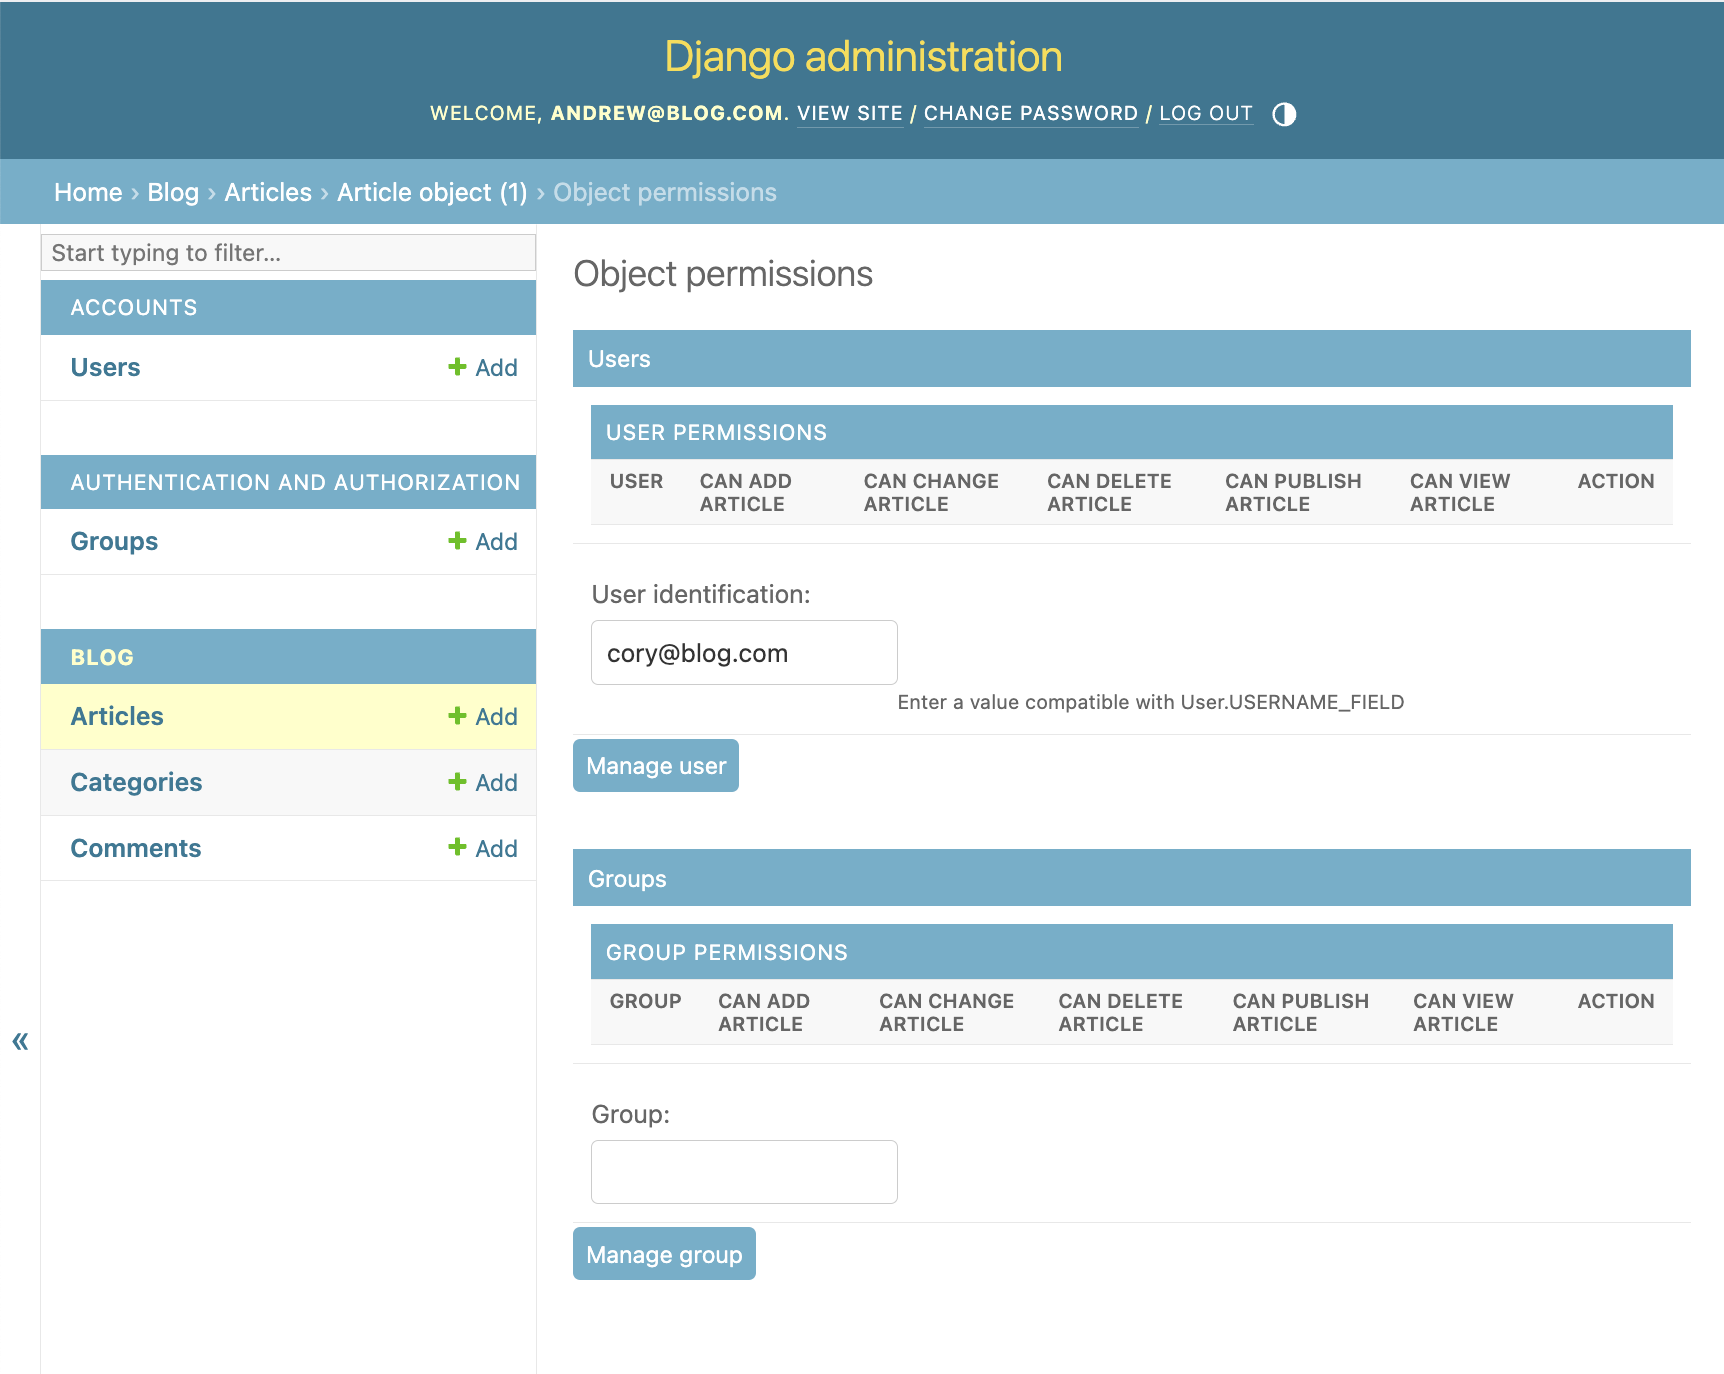
Let's checkout how you can manage Django Guardian permissions in the Django Admin. Let's go in our article, and notice how now we have a Object Permissions button:
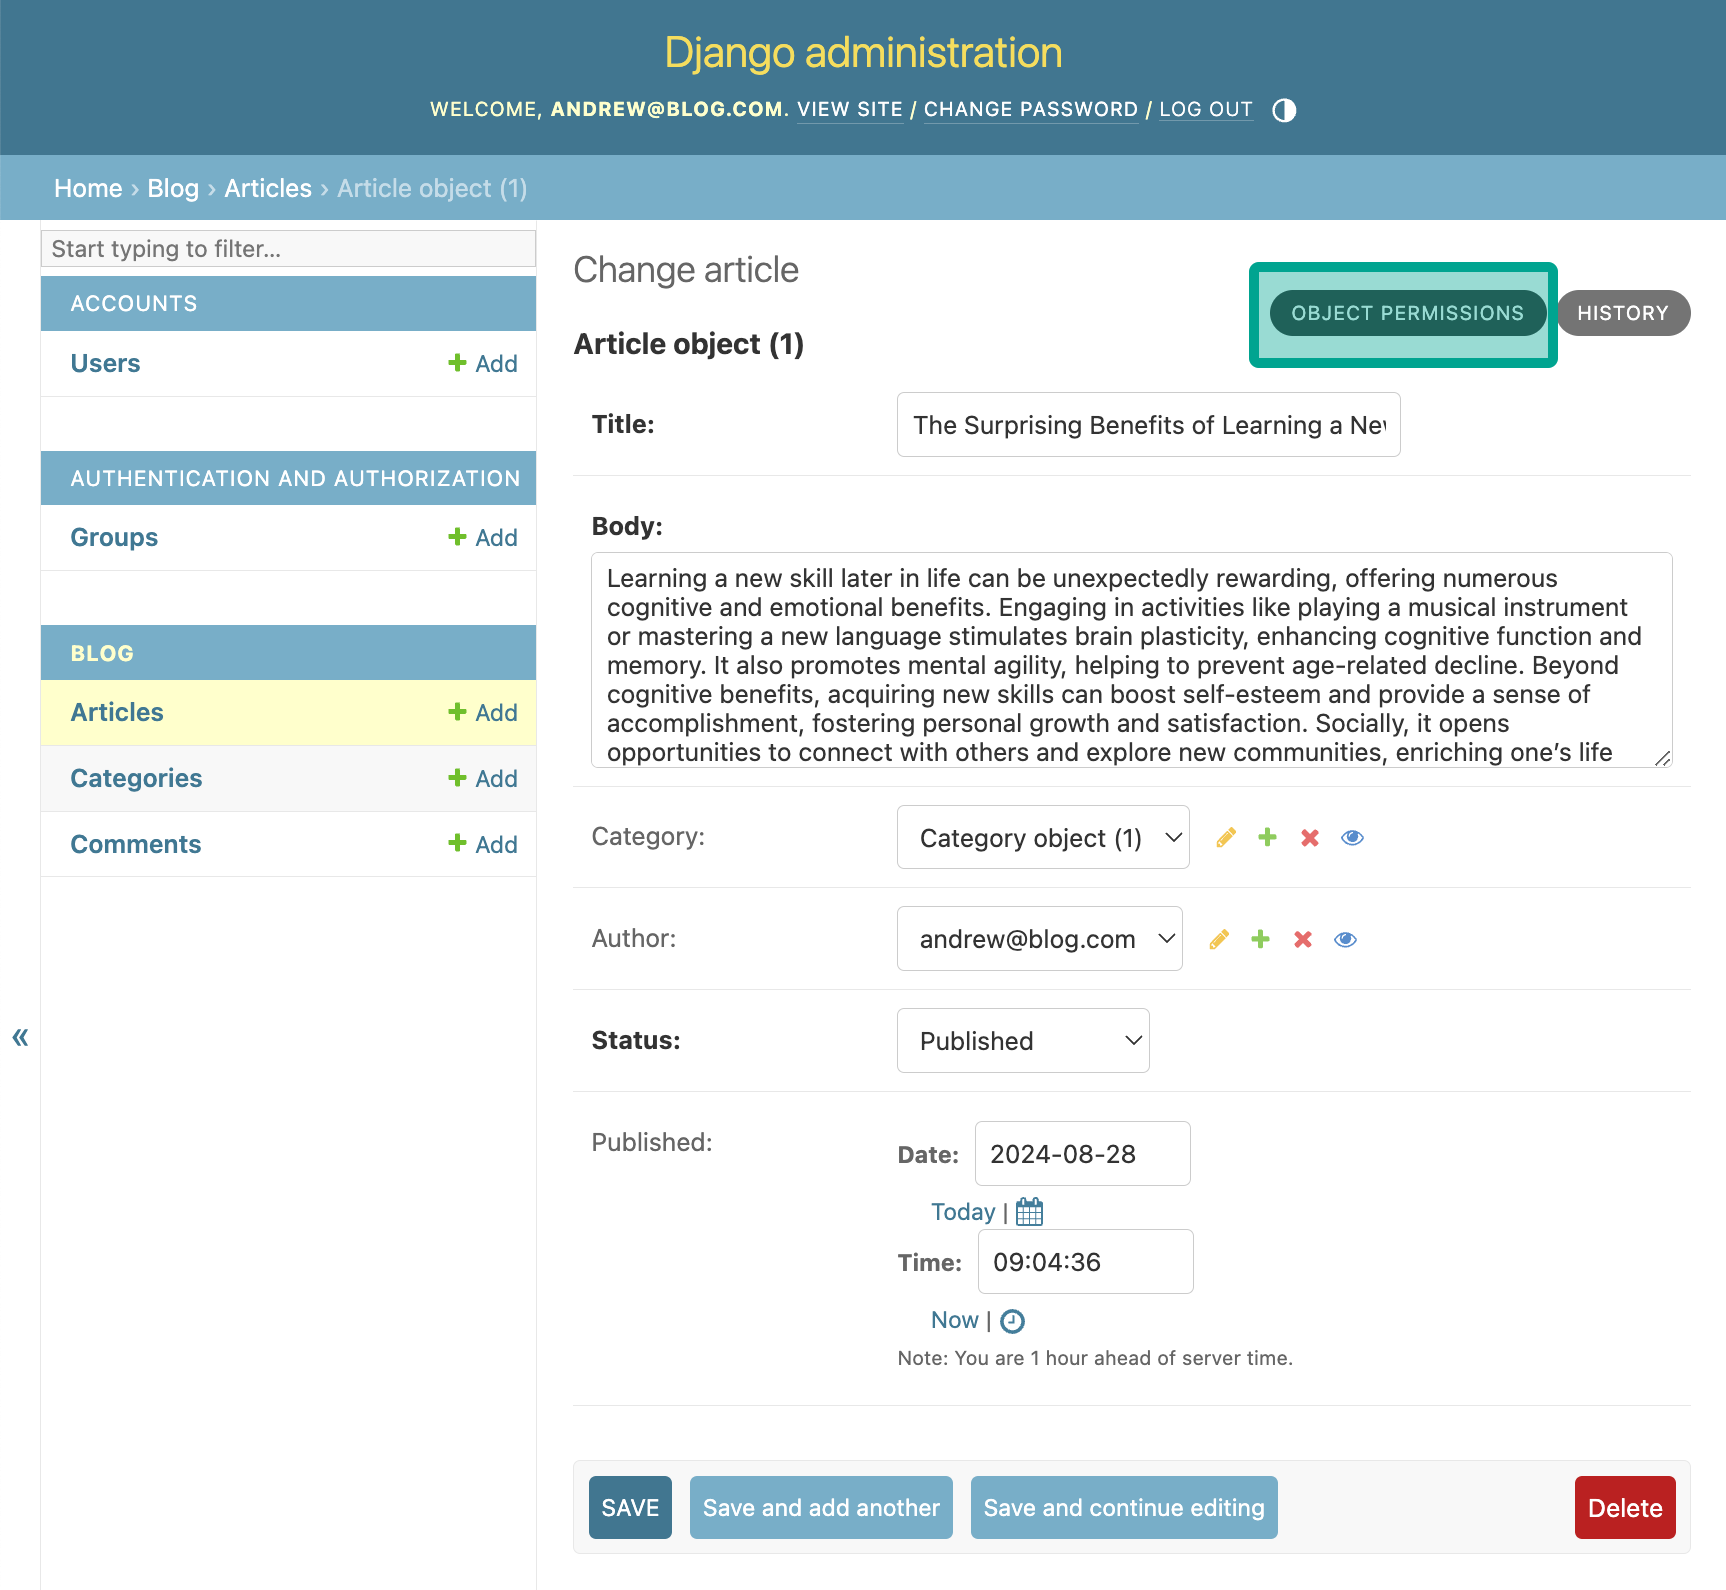
Notice how we don't have any granted permissions for this object.

Let's grant permissions to cory@blog.com:
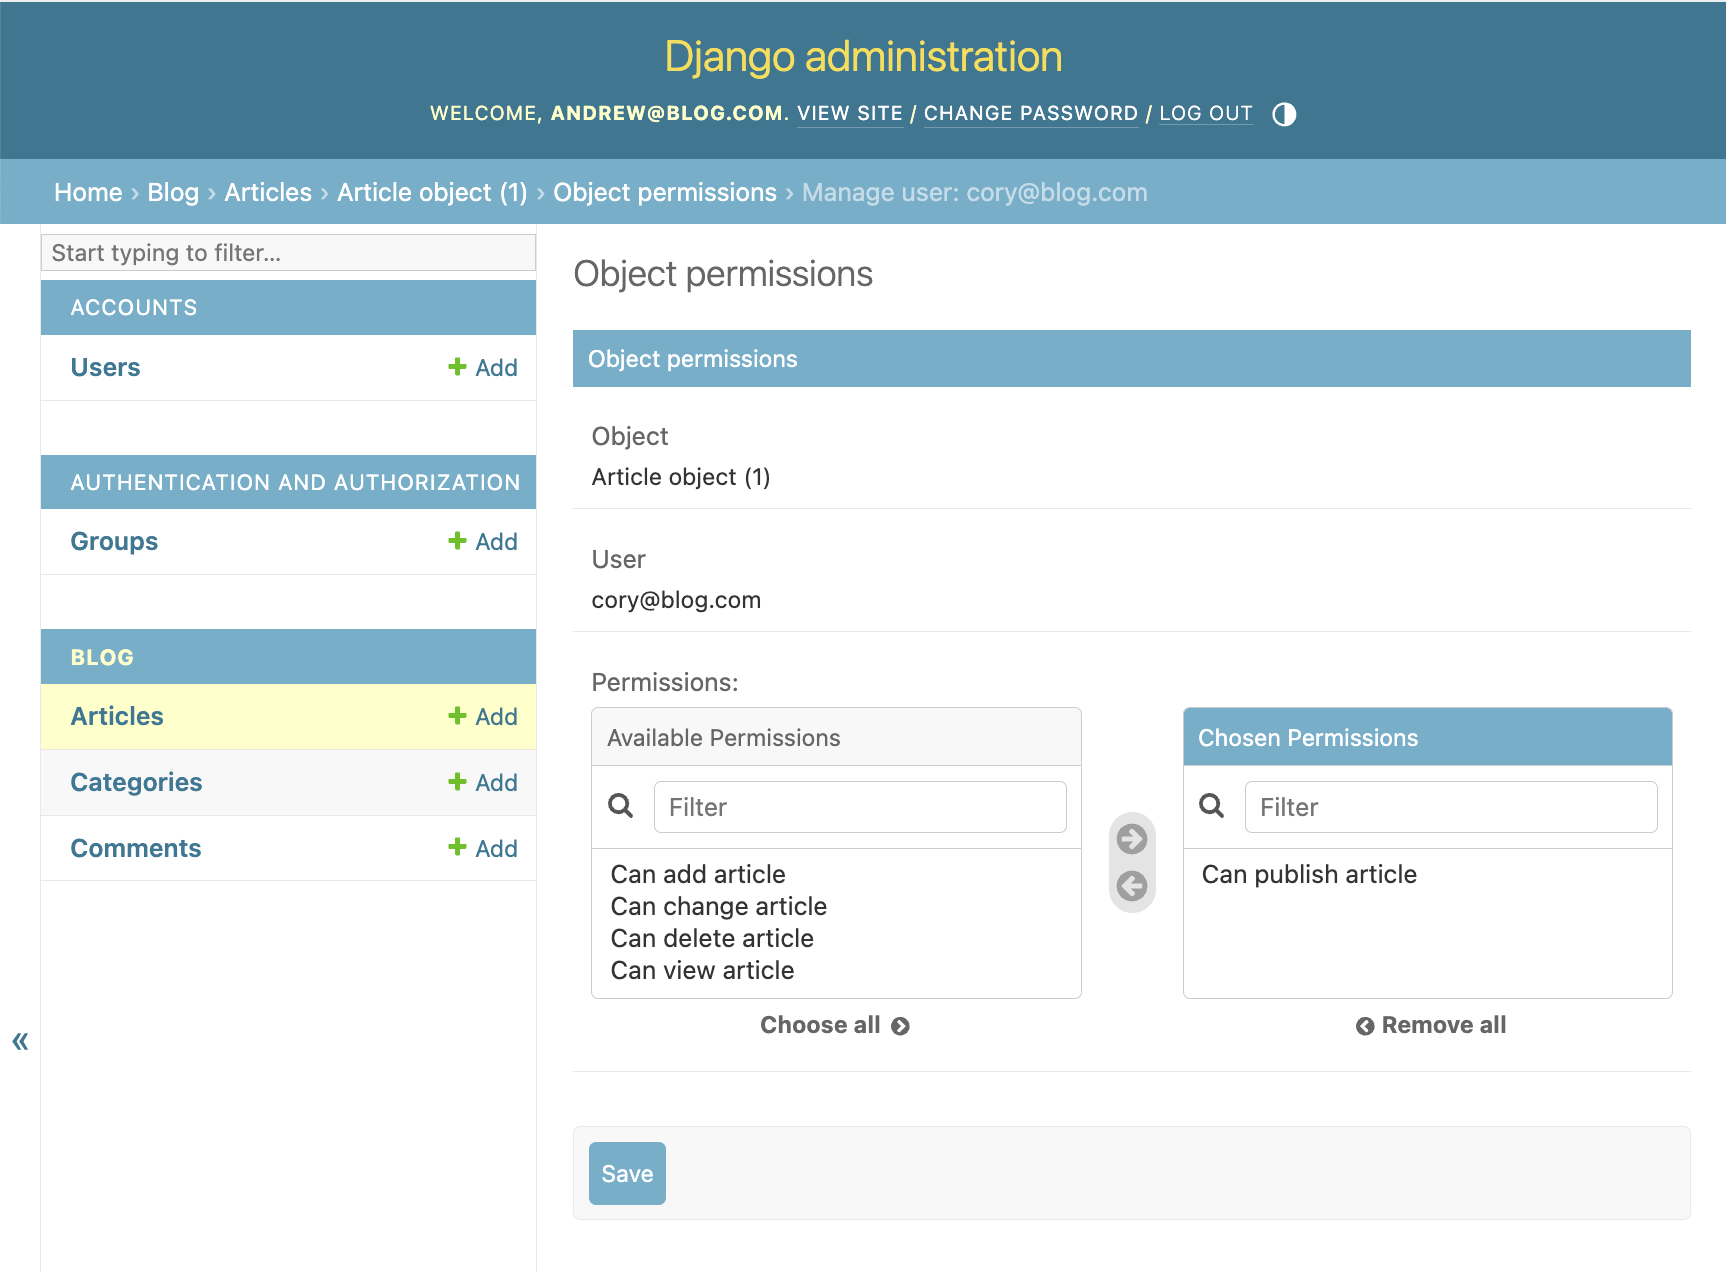
Let's grant cory@blog.com the permission to publish:
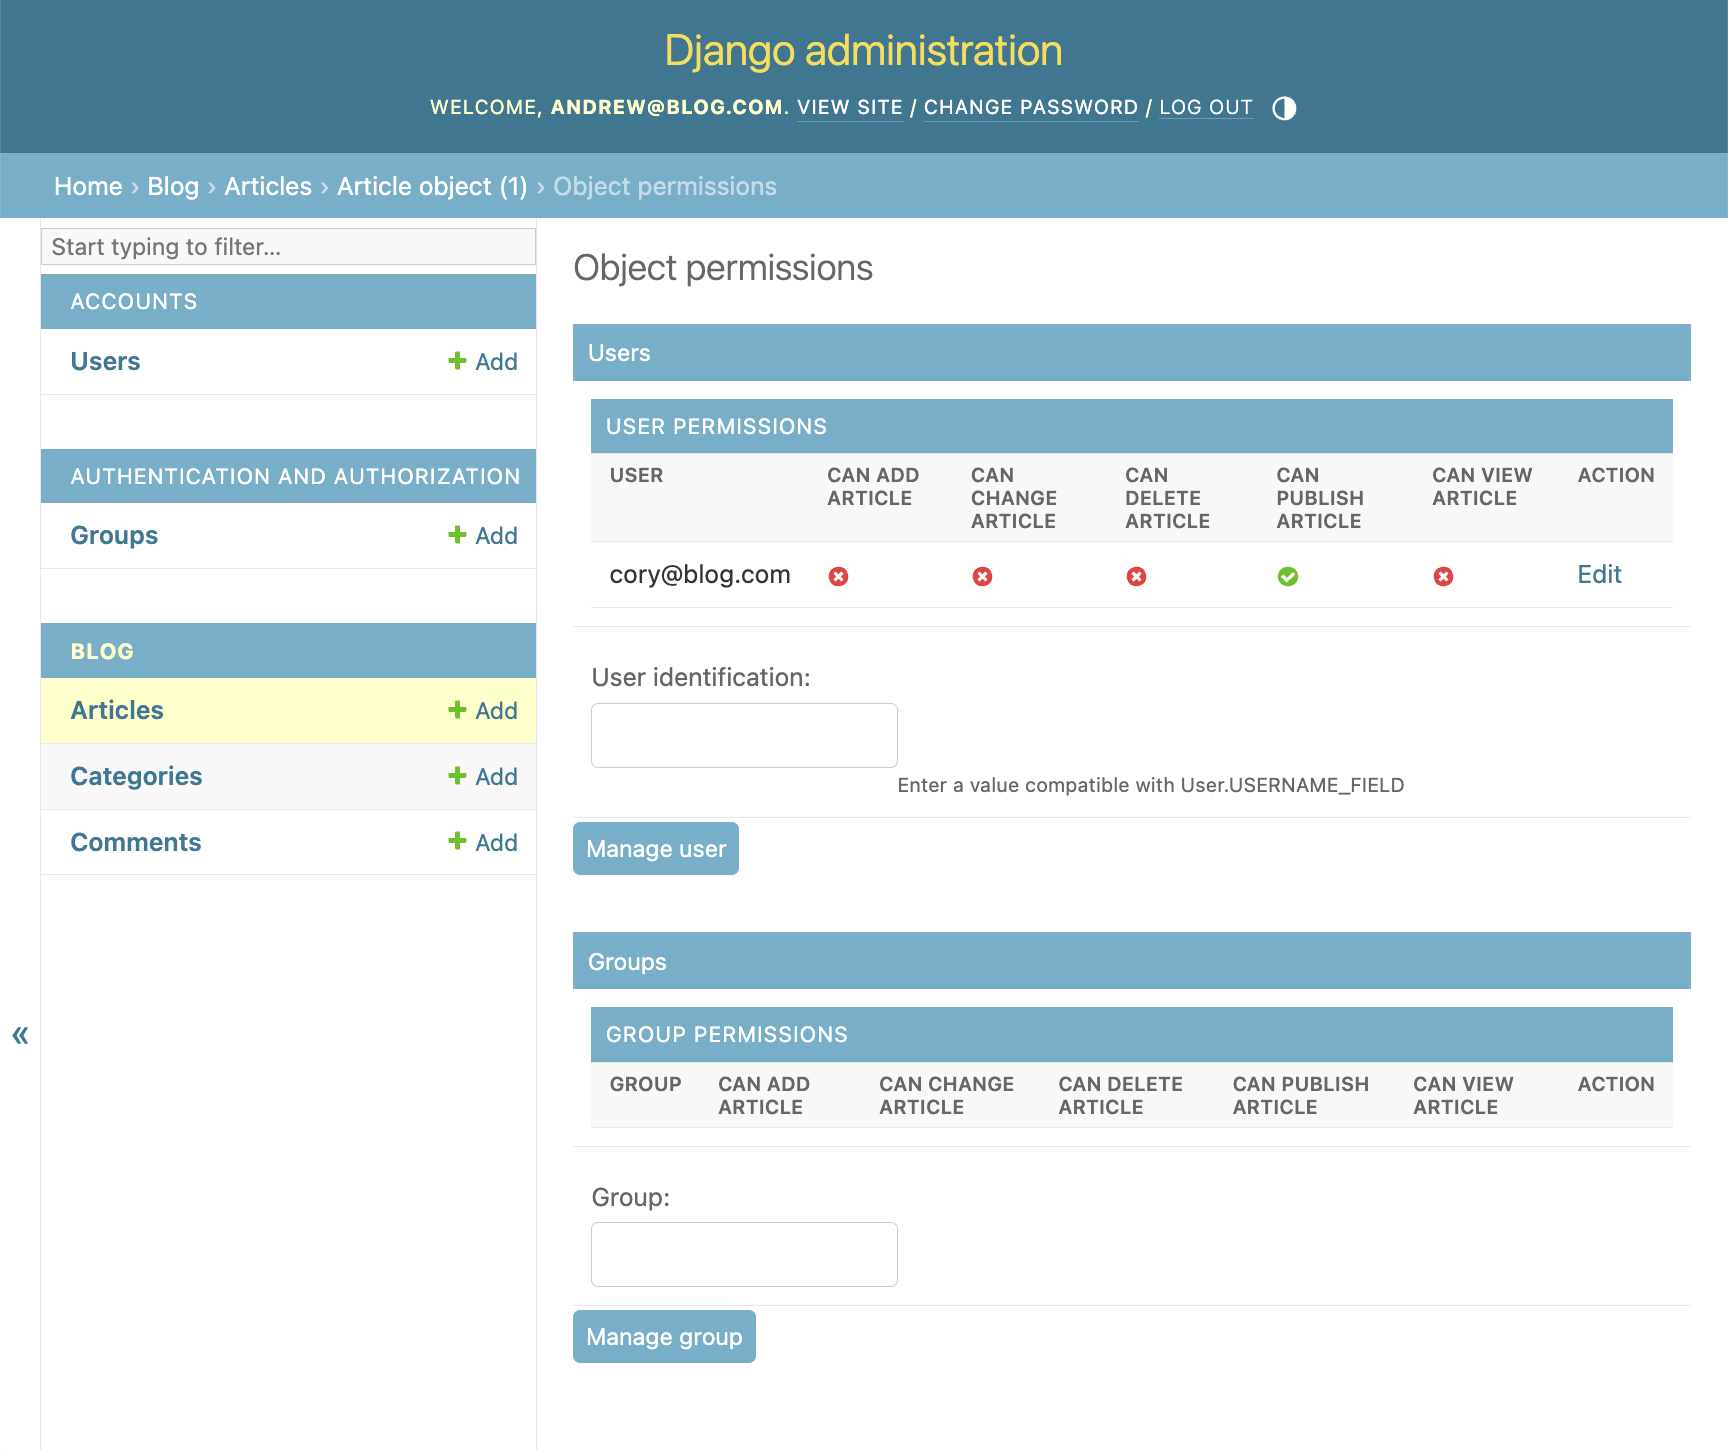
We can now see the permission matrix for cory@blog.com:
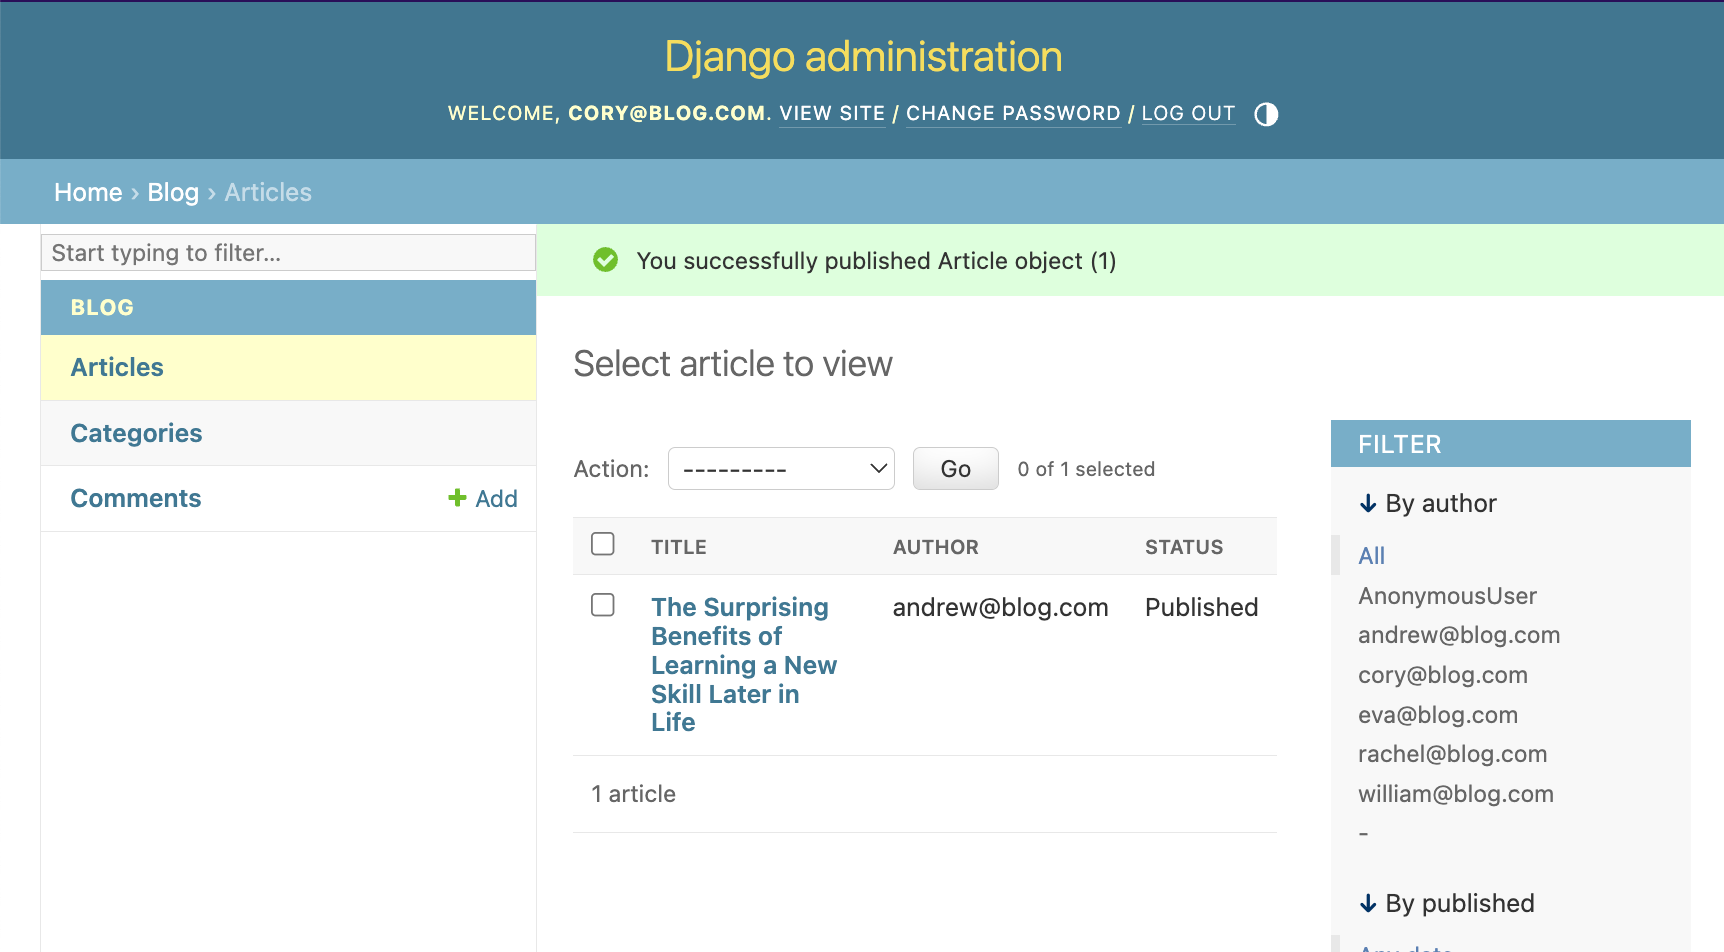
Let's now authenticate as cory@blog.com and publish that article we weren't able before:
Assigning and checking permissions with Django Guardian
Obviously in our applications we don't want to solely rely on manual input in order to set up permissions. Here's how to assign/remove permissions in Django Guardian:
1 2 3 4 5 6 7 | from guardian.shortcuts import assign_perm, remove_perm assign_perm('publish_article', cory, article) cory.has_perm('publish_article', task) # True remove_perm('publish_article', cory, article) cory.has_perm('publish_article', task) # False |
Checking Permissions in Views with Django Guardian
Here's the Django Guardian view decorator equivalent:
1 2 3 4 5 6 7 8 9 10 11 | from guardian.decorators import permission_required_or_403 @login_required @permission_required_or_403( "blog.publish_article", (Article, 'pk', 'article_id') ) def article_publish(request, article_id): # Do some stuff here return render(request, "blog/article_publish.html") |
Wrapping it all up
Phew, that was a lot to cover! This article explored Django’s permission ecosystem, covering both its native permissions and the added flexibility provided by Django Rules and Django Guardian.
Django’s built-in permissions offer a straightforward approach to access control, suitable for probably most applications. However, for more complex needs:
- Django Rules allows for fine-grained, rule-based permissions
- Django Guardian supports object-level permissions for more specific access restrictions
If you combine these tools, you can implement robust and scalable permission systems tailored to their application's needs.