Sending Realtime Notifications in Django with Server Sent Events
22 October, 2024
Here's what you need to know before getting started:
Frequently Asked Questions
- Social Media apps
- Realtime collaboration tools
- Analytics dashboards (like currency or stock tracking applications)
Project Setup
The setup for this project will be pretty easy since we will only create a Notification model.
We're doing this so that we can focus on the Server Side Events part
We're also going to be writing async Django code. In case you're new to async programming this it might look a bit weird. Let's get into it!
In order to be able to write Django async views we need to install Daphne,
an HTTP and Websocket webserver ASGI (Asynchronous Server Gateway Interface).
The best part is that it's developed by the Django team so it integrates beautifully with the framework.
pip install daphne
Let's add it to INSTALLED_APPS, somewhere before 'django.contrib.staticfiles':
1 2 3 4 5 6 7 | INSTALLED_APPS = [ ... 'daphne', ... 'django.contrib.staticfiles', ... ] |
You will also need to add this configuration to your settings.py file:
1 | ASGI_APPLICATION = "{DJANGO_PROJECT_NAME}.asgi.application" |
Make sure to replace {DJANGO_PROJECT_NAME} with your own project name.
Creating the Notification Model
Let's create a simple Notification model.
We are going to continuously query this model and send the new notification,
that have not been dispatched yet to the appropriate user.
1 2 3 4 5 6 7 8 9 10 11 12 | from django.contrib.auth.models import User from django.db import models class Notification(models.Model): user = models.ForeignKey(User, on_delete=models.CASCADE) text = models.TextField() dispatched = models.BooleanField(default=False) created = models.DateTimeField(auto_now_add=True) def __str__(self): return f"{self.user}: {self.text}" |
Main Page
This is the simple part, let's create a traditional Django sync view, rendering a template:
1 2 3 | @login_required def main(request): return render(request, "sse/main.html", {}) |
Here is the template we are rendering:
1 2 3 4 5 6 7 8 9 10 11 12 13 14 15 16 17 18 19 20 21 22 23 24 | <!DOCTYPE html> <html lang="en"> <head> <meta charset="UTF-8"> <title>Django Server Side Events</title> </head> <body> <div> Logged in as: {{ request.user }} </div> <div id="container"></div> <script type="text/javascript"> window.addEventListener("load", function(event) { eventSource = new EventSource('/notifications/'); const container = document.getElementById('container'); eventSource.onmessage = function(event) { console.log(event.data) container.innerHTML += '<p>' + event.data + '</p>'; } }); </script> </body> </html> |
Notice now we use the Server Sent Events API by creating a new EventSource.
Of course the URL /notifications/ is not created yet. That's what's coming up next.
Sending Notifications to Users
1 2 3 4 5 6 7 8 9 10 11 12 13 14 15 16 17 18 19 20 21 22 23 24 25 26 27 28 29 30 31 32 33 34 | import asyncio from datetime import timedelta from asgiref.sync import sync_to_async from django.urls import path from django.utils import timezone from django.contrib import admin, auth from django.http import StreamingHttpResponse, HttpResponse from .models import Notification async def notifications(request): user = await sync_to_async(auth.get_user)(request) if not user.is_authenticated: return HttpResponse(status=403) async def stream(user): while True: now = timezone.now() async for notification in Notification.objects.filter( user=user, dispatched=False, created__gte=now - timedelta(seconds=10) ): yield f"data: {notification.text}\n\n" notification.dispatched = True await sync_to_async(notification.save)() await asyncio.sleep(1) response = StreamingHttpResponse(stream(user), content_type="text/event-stream") response['Cache-Control'] = 'no-cache' return response |
Like mentioned earlier, if you're not used to writing async code in Python this might look a bit weird. Let's break this down:
- Check user is authenticated
-
Create an event stream
- Query for recent, undispatched notifications
- Send over the notification text
- Mark the
Notificationas dispatched - Sleep for 1 second
- Use a StreamingHttpResponse to send over the notifications
Let's also address the weirder parts:
- Everything needs to be marked as async - starting with the view function
-
Database calls need to be made async -
for example:
await sync_to_async(notification.save)() -
Fetching the authenticated user: Since it requires a database query, we need to write
request.useras:await sync_to_async(auth.get_user)(request) -
Waiting the async way: Even sleeping needs to be async:
await asyncio.sleep(1)
Let's hook up the two views:
1 2 3 4 5 | urlpatterns = [ path('admin/', admin.site.urls), path('notifications/', notifications, name='notifications'), path('', main, name='main') ] |
Add the Notification model to the admin:
1 2 3 4 5 6 7 8 | from django.contrib import admin from sse.models import Notification @admin.register(Notification) class NotificationAdmin(admin.ModelAdmin): pass |
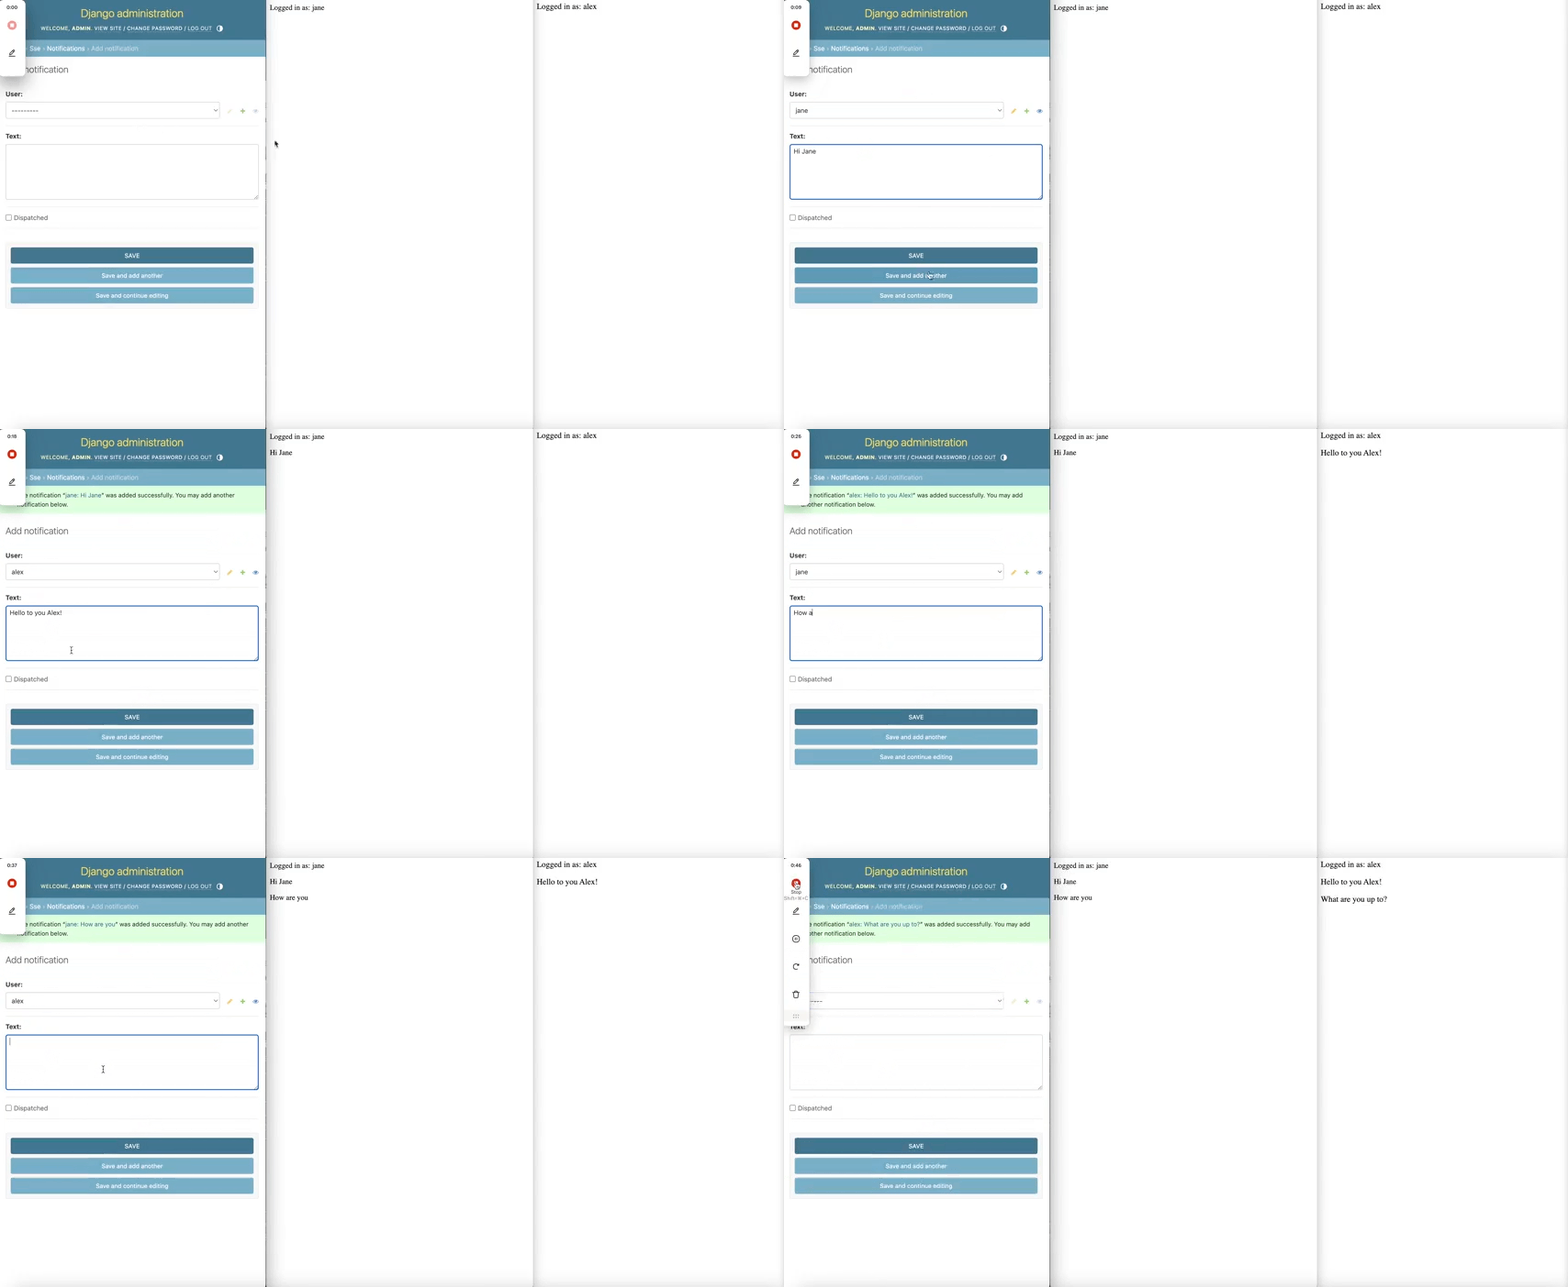
Let's now play a bit:

To achieve this, you need to create some extra users, authenticate as them in different browser windows and send the notifications from the Django Admin. Quite spectacular.

