Build an IP Geolocation SaaS with Python/Django - Part 1
13 June, 2024
Have you ever wondered how does Netflix know where are you accessing their service from? Companies like Netflix adjust their offering in order to comply to local legislation and for providing geographically relevant experiences. You also probably have experienced how an online service changes its language and currency depending where you access it from. All this information comes from the source IP address of the client.
I was really amazed as a kid when I first tried out one of these services and they pinpointed where I was on a map with impressive accuracy.
- ipinfo.io
- ipstack.com
- ipdata.co
The geo-location data is provided by a company called MaxMind, which offers two types of databases: GeoLite2 (Free) and GeoIP2 (Paid). For keeping things simple, we are going to use GeoLite2 but keep in mind that the databases only differ in the quantity of information they offer. They way they work is exactly the same.
For this series we are going to leverage the Python/Django stack and the MaxMind databases.
Here's what you need to know before getting started:
Frequently Asked Questions
Let's start things off by installing Django and initializing the project:
pip install Django
Let's name the Django project ipdb as an acronym for IP DataBase.
django-admin startproject ipdb
- Super easy to setup: SQLite3 doesn't require a separate server to run, making it incredibly easy to install and use. The entire database is contained in a single file.
- Zero Configuration: There are 0 knobs to turn which reduces the complexity of deployment and administration.
- Makes Prototyping easy-peasy: Let's you focus on development without worrying about database management.
- Portable & Cross Platform: Copy/Paste the database file between environments and on any supported OS.
We are now going to run the Django migrate command.
What this does is it creates the SQLite3 database file and will apply the Django migrations on that database.
python manage.py migrate
You should see an output similar to this one:
ipdb % python manage.py migrate
Operations to perform:
  Apply all migrations: admin, auth, contenttypes, sessions
Running migrations:
  Applying contenttypes.0001_initial... OK
  Applying auth.0001_initial... OK
  Applying admin.0001_initial... OK
  Applying admin.0002_logentry_remove_auto_add... OK
  Applying admin.0003_logentry_add_action_flag_choices... OK
  Applying contenttypes.0002_remove_content_type_name... OK
  Applying auth.0002_alter_permission_name_max_length... OK
  Applying auth.0003_alter_user_email_max_length... OK
  Applying auth.0004_alter_user_username_opts... OK
  Applying auth.0005_alter_user_last_login_null... OK
  Applying auth.0006_require_contenttypes_0002... OK
  Applying auth.0007_alter_validators_add_error_messages... OK
  Applying auth.0008_alter_user_username_max_length... OK
  Applying auth.0009_alter_user_last_name_max_length... OK
  Applying auth.0010_alter_group_name_max_length... OK
  Applying auth.0011_update_proxy_permissions... OK
  Applying auth.0012_alter_user_first_name_max_length... OK
  Applying sessions.0001_initial... OK
Database Migrations
Django migrations are essentially version control for your database. They help you manage changes to your database schema, so it aligns with your Django models.
Migrations typically are automatically (but you can also write your onw migrations) generated Python files
stored in a migrations folder within each Django app.
The main job of the migrations is to make sure the Django models you define are in sync with the schema of the database.
Creating a Django Application
Let's get into the meat of it and create a Django application. Django projects are structured as a set of applications that should function independently of each other as much as possible.
python manage.py startapp ipdata
Notice how Django created a new package ipdata
that contains several Python files like models.py and views.py.
Creating the application is not enough, we also need to install it in the ipdb/settings.py file.
This is done by adding ipdata to the INSTALLED_APPS list:
INSTALLED_APPS = [
    'django.contrib.admin',
    'django.contrib.auth',
    'django.contrib.contenttypes',
    'django.contrib.sessions',
    'django.contrib.messages',
    'django.contrib.staticfiles',

    'ipdata',
]
We now need to create the actual Django view that serves the Geo IP data.
For now, let's just mock it up, and we're going to come back to it later.
Drop this code into ipdb/ipdata/views.py:
1 2 3 4 5 6 7 8 9 10 | from django.http import JsonResponse # Create your views here. def ip_data(request): try: ip = request.GET['ip'] except KeyError: return JsonResponse({'error': 'IP address not provided'}, status=400) return JsonResponse({'ip': ip}) |
Let's include that view in the app's url pattern list in ipdb/ipdata/urls.py:
1 2 3 4 5 6 7 8 | from django.urls import path from . import views urlpatterns = [ path('ip_data', views.ip_data, name="ip_data"), ] |
In order for the API URL to be accessible we need to hook up the ipdb/ipdata/urls.py
URL patterns in the to the global URL schema (located in ipdb/ipdb/urls.py) like this:
1 2 3 4 5 6 7 8 | from django.contrib import admin from django.urls import path, include from ipdata import urls as ipdata_urls urlpatterns = [ path('admin/', admin.site.urls), path('api/v1/', include(ipdata_urls)), ] |
Now, if you start Django's development server (python manage.py runserver) you should be able to visit
http://localhost:8000/api/v1/ip_data?ip=12.13.14.15 in your favorite browser.
Serving GeoIP data
Let's start things up by installing some required libraries:
pip install geoip2 pytz
The actual GeoIP data does not come with the library, you need to download it from the MaxMind website. You will have to create an account. Download files from GeoLite2 Free Geolocation Data
You will find several download options, various files and formats (.mmdb and .csv).
Here are the files you need to download:
GeoLite2-ASN.mmdb- Autonomous System Number data in MaxMind formatGeoLite2-Country.mmdb- Country level data in MaxMind formatGeoLite2-City.mmdb- City level data in MaxMind format
The country level data is a bit redundant since all the information is present in the city level database.
Let's now see how to read from these databases. Let's acknowledge first that Django already provides some wrappers over the MaxMind API but we are not going to use it since it doesn't provide a wrapper for the ASN data, which is essential for our API. Here's the GeoIP2 Django Documentation.
Next step is to initialize the MaxMind readers and we are going to do that in the ipdb/ipdata/models.py file.
We don't want the readers to be initialized every API call as it is a costly operation. That's why we don't init them inside the view.
1 2 3 4 5 6 7 8 9 10 11 | import geoip2.database from django.db import models from django.conf import settings GEOIP_ASN_READER = geoip2.database.Reader( settings.GEOIP_PATH / "GeoLite2-ASN.mmdb") GEOIP_CITY_READER = geoip2.database.Reader( settings.GEOIP_PATH / "GeoLite2-City.mmdb") GEOIP_COUNTRY_READER = geoip2.database.Reader( settings.GEOIP_PATH / "GeoLite2-Country.mmdb") |
Now let's write the view that ties everything together.
Notice how we are making use of the various MaxMind APIs for gathering info about our
IPs and how we are using the pytz API to get information about the timezone.
1 2 3 4 5 6 7 8 9 10 11 12 13 14 15 16 17 18 19 20 21 22 23 24 25 26 27 28 29 30 31 32 33 34 35 36 37 38 39 40 41 42 43 44 45 46 47 48 49 50 51 52 53 54 55 56 57 58 59 60 61 62 63 64 65 66 67 68 69 70 71 | import pytz import datetime from pytz.exceptions import UnknownTimeZoneError from django.http import JsonResponse from .models import GEOIP_ASN_READER, GEOIP_CITY_READER # Create your views here. def ip_data(request): try: ip = request.GET['ip'] except KeyError: return JsonResponse( {'error': 'IP address not provided'}, status=400 ) city_response = GEOIP_CITY_READER.city(ip) asn_response = GEOIP_ASN_READER.asn(ip) time_zone = city_response.location.time_zone try: tz = pytz.timezone(time_zone) current_time = datetime.datetime.now(tz) except UnknownTimeZoneError: tz, current_time = None, None ip_data = { 'ip': ip, 'network': str(city_response.traits.network), 'country': { 'name': city_response.country.name, 'iso_code': city_response.country.iso_code, 'is_eu': city_response.country.is_in_european_union, }, 'region': { 'name': city_response.subdivisions.most_specific.name, 'iso_code': city_response.subdivisions.most_specific.iso_code, }, 'coordinates': { 'latitude': city_response.location.latitude, 'longitude': city_response.location.longitude, }, 'city': { 'name': city_response.city.name, 'postal_code': city_response.postal.code }, 'asn': { 'number': asn_response.autonomous_system_number, 'organization': asn_response.autonomous_system_organization, }, 'timezone': { 'name': time_zone, 'current_time': ( current_time.strftime("%Y-%m-%dT%H:%M:%S") if current_time is not None else None ), 'is_dst': ( bool(current_time.dst()) if current_time is not None else None ), 'offset': ( current_time.strftime('%z') if current_time is not None else None ), } } return JsonResponse(ip_data, json_dumps_params={'indent': 2}) |
Let's now see it in action:
1 2 3 4 5 6 7 8 9 10 11 12 13 14 15 16 17 18 19 20 21 22 23 24 25 26 27 28 29 30 31 32 | % curl -X GET "http://localhost:8000/api/v1/ip_data?ip=12.13.14.15" { "ip": "12.13.14.15", "network": "12.13.12.0/22", "country": { "name": "United States", "iso_code": "US", "is_eu": false }, "region": { "name": "Arkansas", "iso_code": "AR" }, "coordinates": { "latitude": 34.7456, "longitude": -92.3419 }, "city": { "name": "Little Rock", "postal_code": "72205" }, "asn": { "number": 7018, "organization": "ATT-INTERNET4" }, "timezone": { "name": "America/Chicago", "current_time": "2023-08-30T12:12:49", "is_dst": true, "offset": "-0500" } } |
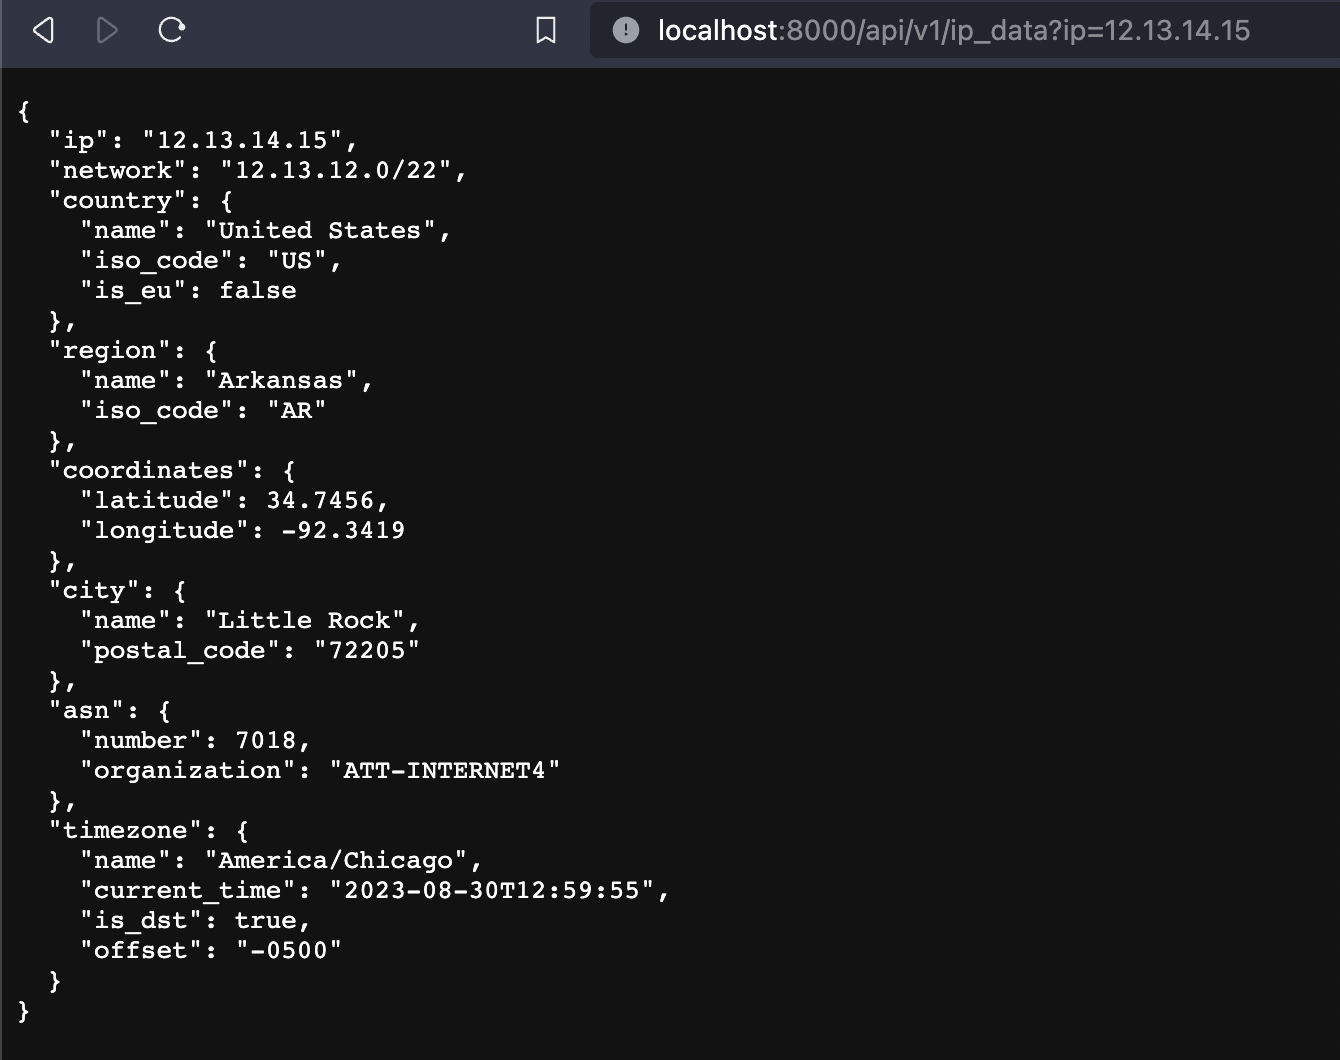
Here's how that looks in the browser:

Congrats, you now have a working API that you can use to get information about IPs. Make sure to save your progress and meet you in the next sections where we are going to build upon our API.
Here are a few things we are going to cover next:
- Authentication - Learn how to authenticate users via email/password via API keys
- Homepage with map - Create a landing page showing a map with the users current location and IP data
- Profiling and Optimization - Let's make things run faster
- UnitTesting - Let's make sure things run properly
- Rate Limiting - Don't let people abuse our APIs
See you in the next one!
